Starting the Console
The Management Console is a web application which was designed to enable users to quickly understand the state of a running data grid cluster and monitor the running components, i.e. physical hosts, JVMs and deployed processing units.
In terms of functionality, it does not replace the existing Java-based GUI (the XAP Management Center), but rather augments it and provides a lightweight alternative for monitoring a running cluster without the need to install the GigaSpaces XAP runtime and run the standalone Java-based user interface.
The management console web application is located under XAP root/tools/gs-webui. This directory contains the web application itself (in the form of a standard JEE .war file), and a launcher library and shell scripts used to start in standalone mode (see below).
The management console web application can be started in one of the following ways:
Starting in Standalone Mode
This is the simplest way to run the management console web application. Simply click the gs-webui.sh(bat) script to start a Jetty web container with the management console web application running within it. Once started, there’s no need to deploy or perform any additional steps.
The web container in the standalone mode listens by default on port 8099, so in order to view the management console application you will need to point your browser to http://<standalone server host>:8099, where <standalone server host> is the host on which you launched the gs-webui script. Note that in this mode, the default context path for the management console web application is the root context path (“/”).
To override the default port, you can either use the com.gs.webui.port system property, or specify -port <listen port> as an argument to the gs-webui script. Here is an example on how it’s done (starting to listen on port 80):
#Specify port via a command line argument
./gs-webui.sh -port 80

#Specify port with a system property
export WEBUI_PORT=80
./gs-webui.sh
#Specify port via a command line argument
gs-webui.bat -port 80

#Specify port with a system property
set WEBUI_PORT=80
gs-webui.bat
Note that you can also use the WEBUI_JAVA_OPTIONS environment variable to set any JVM parameter, such as heap size (defaults to -Xmx512m) and other JVM settings.
In order to disable anonymous login and define user name login field as mandatory use the com.gigaspaces.webui.username.mandatory system property. Here is an example on how it’s done:
#Specify user name field as mandatory
export USER_NAME_MANDATORY=true
./gs-webui.sh
#Specify user name field as mandatory
set USER_NAME_MANDATORY=true
gs-webui.bat
Deploying to the XAP Runtime Environment
To deploy the management console web application to the XAP Runtime Environment, you should simply point your deployment tool of choice (CLI, Admin API or the standalone Java-based UI) to the <XAP root>/tools/gs-webui/gs-webui.war file and deploy it.
Note that in this case the management console application actually monitors the runtime environment on which it runs.
Here’s an example of how this can be done using the GS CLI:
<XAP root>/bin/gs.sh(bat} deploy -properties embed://web.port=80;web.context=/
<XAP root>/tools/gs-webui/gs-webui.war
The above command will deploy the management console web application to the GigaSpaces runtime environment, listening on port 80 with the root context path.
For more details on XAP’s web application support, please refer to this page.
Deploying the Management Console Web Application to a 3rd Party JEE Servlet Container
It is also possible to deploy the web application to a 3rd party servlet container (e.g. Apache Tomcat). Please consult your web container documentation for deployment instructions.
When deploying to a 3rd party web container like tomcat, you will need to repackage the gs-webui.war file and add all the .jar files located under <XAP root>/lib/required to the WEB-INF/lib directory of the gs-webui.war file. By default, they are not part of the the gs-webui.war file since they are automatically included in the classpath of both the standalone container and the XAP Runtime Environment
Logging into the Web Dashboard
After you’ve started the dashboard web application, point your browser to the proper location (For example, if you stated it using the standalone web container, the default URL is http://<standalone server host>:8099.
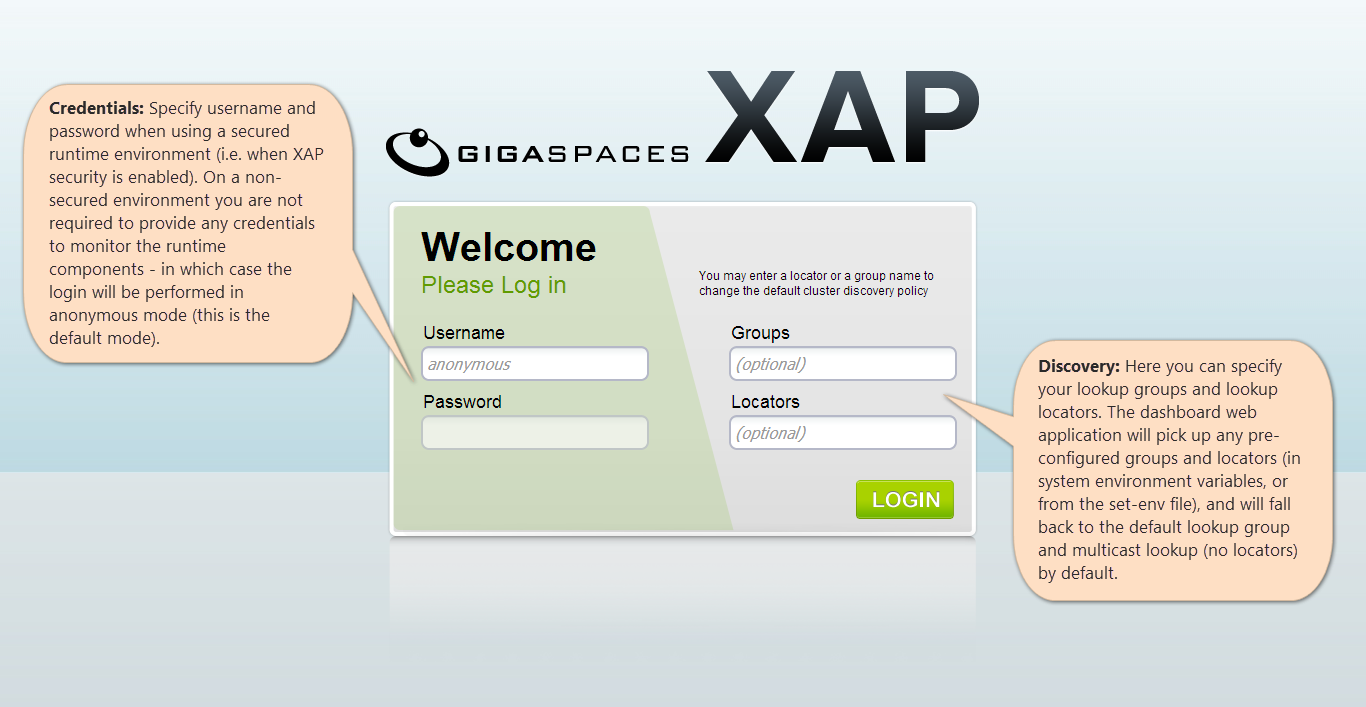
You will see the following login screen (see inline notes for the available login options):
Supported Web Browsers Currently, the web dashboard supports the following web browsers:
Internet explorer is supported from version 10 and higher.
Runtime Considerations
Deployment Location of the Dashboard Web Application
Since the dashboard web application communicates with the runtime components of the XAP cluster, and receives notification from the XAP lookup service, it is highly recommended to run the dashboard web application in the same network segment of the other cluster components. Note that this does not affect the dashboard web browser client, which communicates with the dashboard web application using standard http and can be located anywhere, provided that it has access to the dashboard web application.
Running Via A Reverse Proxy
Version 9.5.1 onwards
It is possible to set up a reverse proxy for the management console. This can be desirable e.g. when access to the Management Console is done via a gateway. Reverse proxy setups are currently available and tested only on the Apache web server.
Configuring The Proxy
Enable the relevant modules, by un-commenting (or adding) the following lines inside httpd.conf:
LoadModule  proxy_module         modules/mod_proxy.so
LoadModule  proxy_http_module    modules/mod_proxy_http.so
Add your server’s name, and define a virtual host for the configuration, where gs.webui.com represents your server’s DNS:
NameVirtualHost *:80
<VirtualHost *:80>
        ServerName gs.webui.com
</VirtualHost>
Create mappings to channel proxy paths (webui-endpoint being the proxied path obscuring the address of the Management Console):
<VirtualHost *:80>
        ...
        ProxyPass /webui-endpoint/ http://127.0.0.1:8099/
        ProxyPassReverse /webui-endpoint/ http://127.0.0.1:8099/
        ProxyPreserveHost on
</VirtualHost>
Set a redirection rule for serving the login page:
<VirtualHost *:80>
        ...
        RedirectMatch /Gs_webui.html /webui-endpoint/Gs_webui.html
</VirtualHost>
Debugging Your Proxy
You can dump logging information to custom files on the Apache server by adding the following rules:
<VirtualHost *:80>
        ...
        ErrorLog "logs/webui-error_log"
        CustomLog "logs/webui-access_log" common
</VirtualHost>
For more information on apache’s reverse proxy configuration, see the corresponding entry on the Apache Tutor.