HTTP Session Sharing
With XAP you can share HTTP session data across multiple data centers, multiple web server instances or different types of web servers.
 Global HTTP Session sharing
This tutorial will show you:
- Single-Applications Session Sharing sharing the same session between different Tomcat instances.
a. Using Apache Load Balancer with Sticky Session configuration
b. Using Apache Load Balancer with Non-Sticky Session configuration - Multiple-Applications Session Sharing - sharing the same session between different applications running in different Web servers - Tomcat and JBoss.
Prior running the Tutorial
Make sure you have enough disk space to install:
- XAP 10 - 150MB
- Tomcat 7.0.23 - 80MB
- JBoss 7 - 200MB
- Apache Load Balancer (httpd-2.2.29) - 50 MB
The demo application can be downloaded: demo-app.war
Single Application Session Sharing
With this session sharing model, the web user interacting with multiple web servers through a load balancer where each web server running the same web application. In most cases you will have multiple instances of the same web app running in a cluster configuration. The load balancer route requests based on the session configuration.
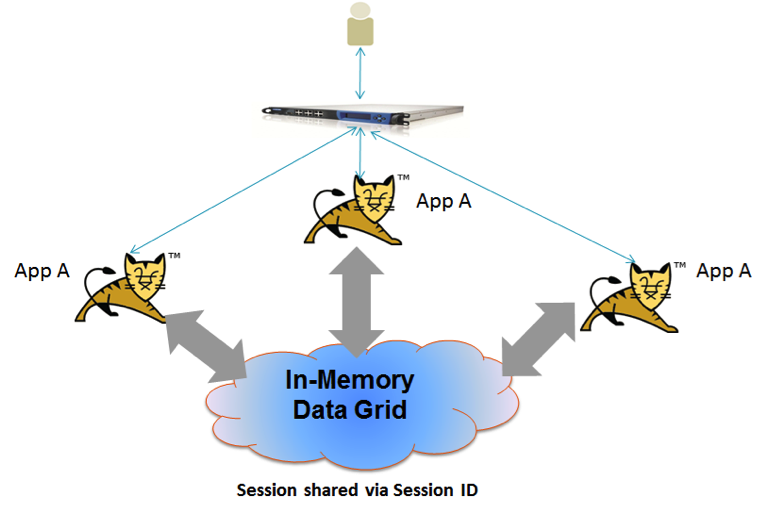
In this scenario the session is shared via its ID. Where there is a web server failure or when a new web server is added to the cluster the session ID is used to retrieve the session from the IMDG. Only the updated attributes (delta) are sent to the IMDG when the session is updated. This ensure best application performance and minimal network bandwidth usage.
Configuring The Load Balancer
Here is an example configuration of the apache httpd to load-balance web requests between the different web servers.
Step 1: Install apache httpd .
Step 2:
Create a file named HttpSession.conf located at
Step 3
Configure the <Apache2.2 HTTPD root>\conf\httpd.conf to have the following:
Include "/tools/Apache2.2/conf/gigaspaces/*.conf"

LoadModule proxy_module modules/mod_proxy.so
LoadModule proxy_balancer_module modules/mod_proxy_balancer.so
LoadModule proxy_http_module modules/mod_proxy_http.so
LoadModule status_module modules/mod_status.so

Listen 127.0.0.1:8888

ProxyPass /balancer !
<Location /balancer-manager>
    SetHandler balancer-manager

    Order deny,allow
    Deny from all
    Allow from 127.0.0.1
</Location>
The
/tools/Apache2.2 folder name should be replaced with your correct Apache httpd location. The
127.0.0.1 IP should be replaced with appropriate IP addresses of the machine that is running apache.Demo Flow
With this demo we will simulate session sharing between different tomcat instances by starting tomcat , running the application, terminating tomcat and later restarting tomcat without losing application HTTP Session data.
a. Running Apache Load Balancer with Sticky Session configuration
For the first demo we will use Apache Load Balancer with Sticky Session Configuration.
Place the following within the HttpSession.conf file. The BalancerMember should be mapped to different URLs of your web servers instances. With the example below we have two Tomcat instances using ports 8080 and 9090. Note the stickysession=JSESSIONID:
<VirtualHost *:8888>
  ProxyPass / balancer://HttpSession_cluster/ stickysession=JSESSIONID
  ProxyPassReverse / balancer://HttpSession_cluster/ stickysession=JSESSIONID

  <Proxy balancer://HttpSession_cluster>
     BalancerMember http://127.0.0.1:8080 route=HttpSession_1
     BalancerMember http://127.0.0.1:9090 route=HttpSession_2
  </Proxy>
</VirtualHost>
The
127.0.0.1 IP should be replaced with IP addresses of the machine(s)/port(s) of WebSphere/Tomcat instances.- Download Tomcat 7.0.23
- Install Tomcat by unzipping it into
c:\ord:\ - For the sake of this demo, make a copy of the extracted Tomcat folder so we will have two Tomcat instances running on different ports.
- Install XAP by unzipping it into
c:\ord:\ - Start two Tomcat instances by running
\TOMCAT_HOME\bin\startup.batfrom the two Tomcat folders we prepared in the previous steps.- Lets assume that the first instance is running with port 8080 and the second one with port 8090.
- Move to the
XAP_HOME/binfolder and start XAP agent by running:
gs-agent.bat
# start the agent with the REST interface
# Windows
gs-agent.bat --manager-local --gsc=2
# Unix
./gs-agent.sh --manager-local --gsc=2
- Deploy a space named sessionSpace. You may have a single instance Space or deploy a clustered Space using the command line , GS-UI or the Web-UI. Here is how you can do this via the CLI
gs.bat deploy-space sessionSpace
curl -X POST --header 'Content-Type: application/json' --header 'Accept: text/plain'
'http://localhost:8090/v1/spaces?name=sessionSpace&requiresIsolation=false'
- Double check the shiro.ini within the
demo-app.warfile located under theWEB-INFfolder includes the lookup service host name as part of theconnector.urlproperty. With the example below we are using a lookup service running locally - hence thelocalhostis used:
connector.url=jini://localhost/*/sessionSpace
- Deploy the
demo-app.warinto Tomcat by placing it into \apache-tomcat-7.0.23\webapps - Start your web browser and access the web application via the following URL:
http://localhost:8888/demo-app
The URL above assumes the Apache Load Balancer is configured to use port 8888.
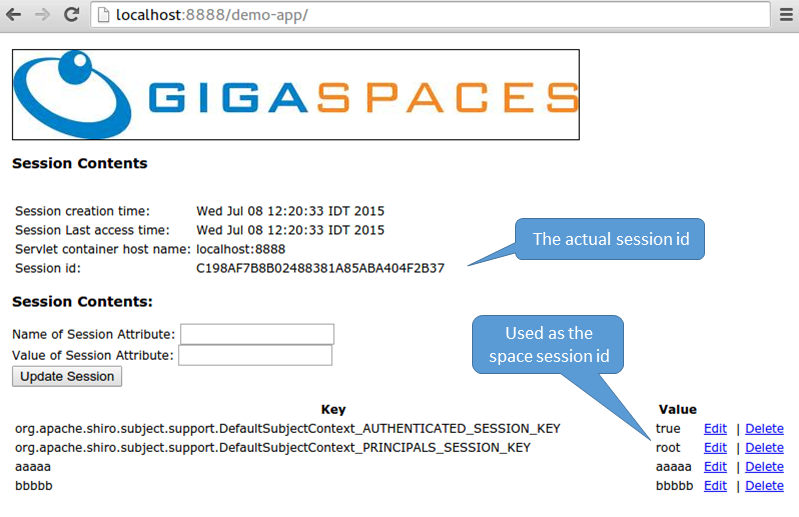
- Add some attributes using the interface provided
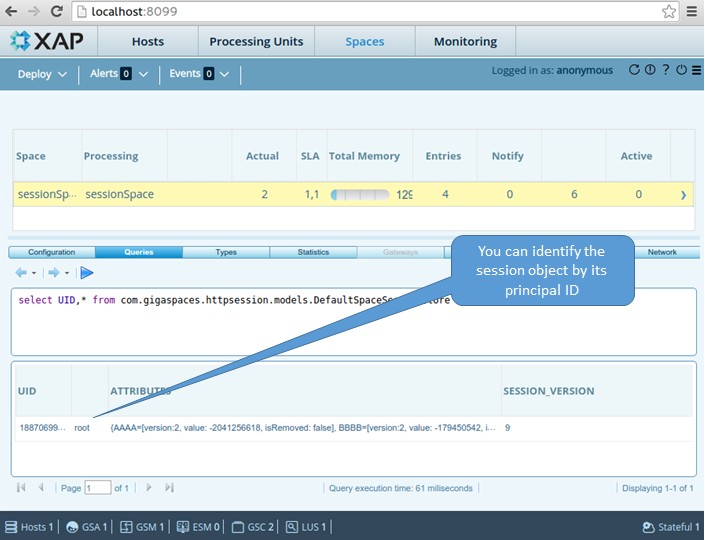
- View the session updated within the space via the GS-UI or Web-UI

- Identify the Session ID
Webserver Failover
- Terminate Tomcat by terminating its process
- Refresh the page (press the
F5key) - you should get an error. There is no web server to serve the HTTP request. - Start Tomcat again using :
\apache-tomcat-7.0.23\bin\startup.bat
- Refresh the page on the browser (press the
F5key). - The session will be reloaded from the data grid. See tomcat console for log messages.
b. Running Apache Load Balancer with Non-Sticky Session configuration
With GigaSpaces HTTP Session Management, the session and its attributes are stored in the space. Once the webserver requests the session, it is retrieved from the space and thus will be available in each webserver. This allows using the Non-Sticky Session model.
To use the Non-Sticky Session model, you only need to configure the Load Balancer. Note that the only change is to remove the stickysession=JSESSIONID as following:
<VirtualHost *:8888>
  ProxyPass / balancer://HttpSession_cluster/
  ProxyPassReverse / balancer://HttpSession_cluster/

  <Proxy balancer://HttpSession_cluster>
     BalancerMember http://127.0.0.1:8080 route=HttpSession_1
     BalancerMember http://127.0.0.1:9090 route=HttpSession_2
  </Proxy>
</VirtualHost>
Multi-Applications Session Sharing
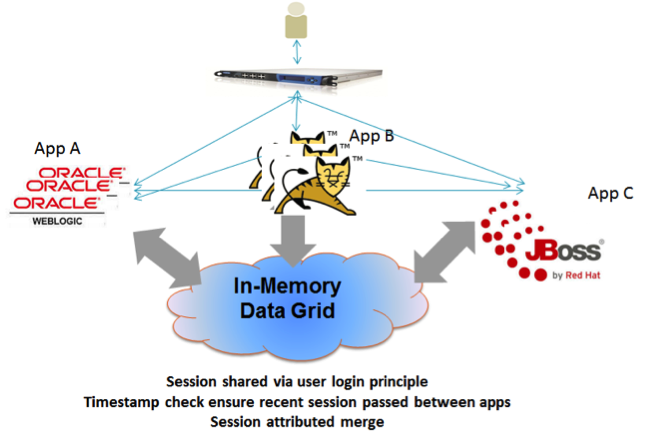
With this session sharing model , the web user interacting with multiple web servers through a load balancer where each running a different web application. It may be one big web application that has been broken down into different modules each running within a different web server potentially running on a different host. Each web application may access different web application instance during the life cycle of the application.
In this scenario the session user login - the principal , used to identify the session to be shared across the different applications. You may have also multiple instances of each web application running to scale its activity. All will be sharing the same HTTP session.
Any new web server that will be added dynamically will be able to share the session. When the HTTP session is updated only the updated session attributes (delta) is sent to the IMDG. When the session is shared between different web applications where each might have a different version of the session - a timestamp check is performed to ensure the recent session is passed between the apps and also to be stored within the IMDG. In such a case , HTTP session attributes are merged to ensure no data is lost when navigating between the different web application modules.
Demo Flow
With this demo we will simulate session sharing between Tomcat and JBoss web servers instances by starting Tomcat and JBoss , running the application on both , updating the HTTP session in both - where the session will be shared implicitly , terminating tomcat and JBoss and later restarting these without losing application HTTP session data.
- Double check the shiro.ini within the
demo-app.warfile located under theWEB-INFfolder includes the lookup service host name as part of theconnector.urlproperty. With the example below we are using a lookup service running locally - hence thelocalhostis used:
connector.url=jini://localhost/*/sessionSpace
- Deploy
demo-app.warinto Tomcat by placing it into\apache-tomcat-7.0.23\webapps - Make a copy of demo-app.war named demo-app2.war
- Deploy
demo-app2.warinto JBoss by placing it into\jboss-as-7.1.1.Final\standalone\deployments - Edit
\jboss-as-7.1.1.Final\standalone\configuration\standalone.xml
To have:
<socket-binding name="http" port="8081"/>
- Start JBoss by running :
\jboss-as-7.1.1.Final\bin\standalone.bat
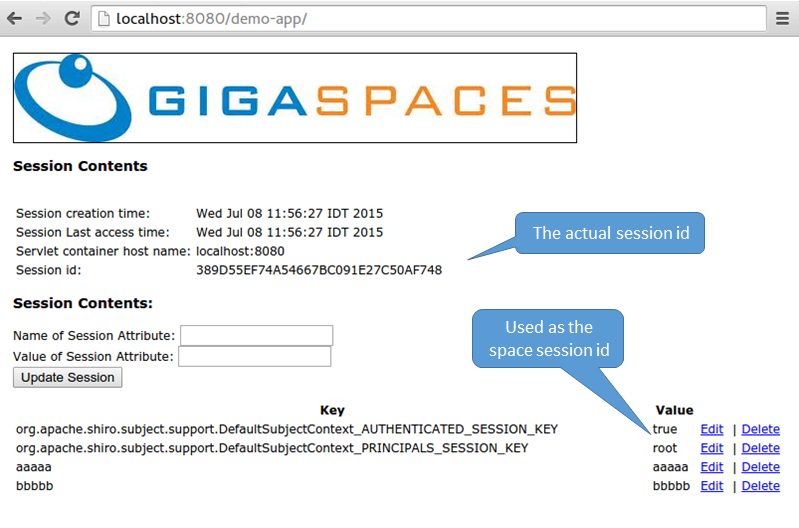
- Start your web browser and access the web application running in Tomcat via the following URL:
http://localhost:8080/demo-app
Login into the application running on Tomcat using :
- user : root
- password : secret
Add some attributes using the interface provided
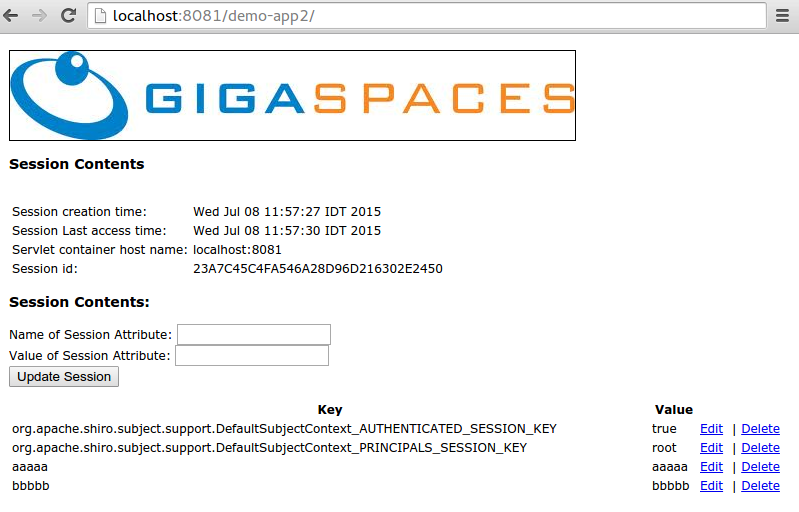
- Start your browser and access the web application running in JBoss via the following URL:
http://localhost:8081/demo-app2
Login into the application running on JBoss using :
- user :
root - password :
secret
- user :
You should see all attributes added into the session via Tomcat are shared with the application running on JBoss.
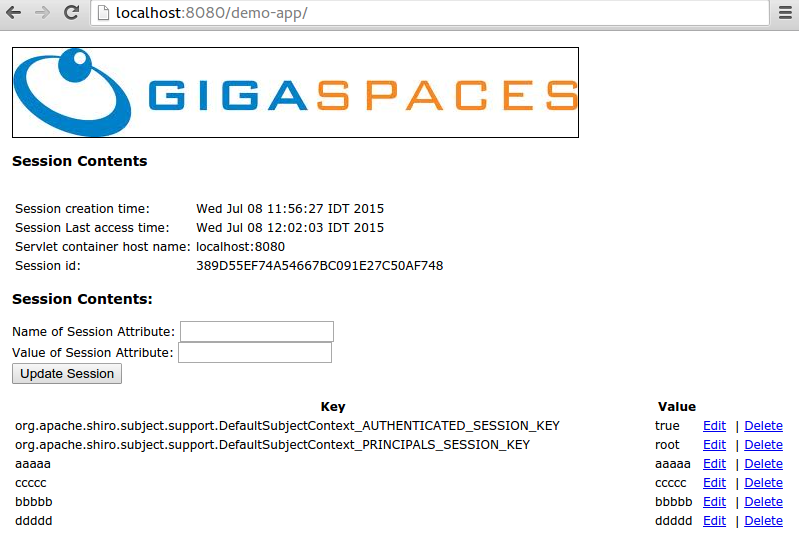
- Add / Modify some attributes

- Switch to Tomcat:
http://localhost:8080/demo-app
- Refresh the page (press the
F5key) - see all the attributes been updated.
Webserver Failover
- Terminate both Tomcat and JBoss by terminating their process
- Refresh these by press the
F5key :
http://localhost:8080/demo-app
http://localhost:8081/demo-app2
- An error message will be displayed as both Tomcat and JBoss cannot serve the HTTP request.
- Start Tomcat and JBoss
- Refresh the pages served by Tomcat and JBoss by pressing the
F5key - Login via user:
root, password:secret - See session been fully recovered.