Your First Real Time Big Data Analytics Application
We live almost every aspect of our lives in a real-time world. Think about our social communications; we update our friends online via social networks and micro-blogging, we text from our cell phones, or message from our laptops. But it’s not just our social lives; we shop online whenever we want, we search the web for immediate answers to our questions, we trade stocks online, we pay our bills, and do our banking. All online and all in real time.
 Real Time Analytics
Real time doesn’t just affect our personal lives. Enterprises and government agencies need real-time insights to be successful, whether they are investment firms that need fast access to market views and risk analysis, or retailers that need to adjust their online campaigns and recommendations to their customers. Even homeland security has come to increasingly rely on real-time monitoring. The amount of data that flows in these systems is huge. Twitter, for example, 500 million Tweets per day, which is nearly 3,000 Tweets per second, on average. At various peak moments through 2011, Twitter did as high as 8,000+ TPS, with at least one instance of over 25,000 tps. Facebook gets 100 billion hits per day with 3.2B Likes & Comments/day. Google get 2 billion searches a day. These numbers are growing as more and more users join the service.
This tutorial explains the challenges of a Real-time (RT) Analytics system using Twitter as an example, and show in details how these challenges can be met by using GigaSpaces XAP.
The Challenge
Twitter users aren’t just interested in reading tweets of the people they follow; they are also interested in finding new people and topics to follow based on popularity. This poses several challenges to the Twitter architecture due to the vast volume of tweets. In this example, we focus on the challenges relating to calculating the word count use case. The challenge here is straightforward:
- Tens of thousands of tweets need to be stored and parsed every second.
- Word counters need to be aggregated continuously. Since tweets are limited to 140 characters, we are dealing with hundreds of thousands of words per second.
- Finally, the system needs to scale linearly so the stream can grow as the business grows.
These challenges are not simple to deal with as there are knock-on effects from the volume and analysis of the data, as follows:
- Tens of thousands of tweets to tokenize every second, meaning hundreds of thousands of words to filter -> CPU bottleneck
- Tens/hundreds of thousands of counters to update -> Counters contention
- Tens/hundreds of thousands of counters to persist -> Database bottleneck
- Tens of thousands of tweets to store in the database every second -> Database bottleneck
Solution Architecture
In designing a solution, we need to consider the various challenges we must address.
The first challenge is providing unlimited scalability - therefore, we are talking about dynamically increasing resources to meet demand, and hence implementing a distributed solution using parallelized processing approach.
The second challenge is providing low latency - we can’t afford to use a distributed file system such as Hadoop HDFS, a relational database or a distributed disk-based structured data store such as NoSQL database. All of these use physical I/O that becomes a bottleneck when dealing with massive writes. Furthermore, we want the business logic collocated with the data on a single platform for faster processing, with minimal network hops and integration issues.
To overcome the latency challenge, we use an in-memory system of record. GigaSpaces XAP is built just for that. Its core component is in-memory data grid (IMDG, a.k.a. the Space) that partitions the data based on a specified attribute within the data object. The data grid uses a share nothing policy, and each primary node has consistent backup. In addition the grid keeps its SLA by self-healing crashed nodes, so it’s completely consistent and highly-available.
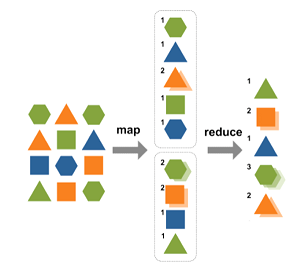
The third challenge is the efficient processing of the data in a distributed system. To achieve this, we use the Map / Reduce algorithm for distributed computing on large data sets on clusters of computers. In the Map step, we normalize the data so we can create local counters. In the Reduce step, we aggregate the entire set of interim results into a single set of results.
In our Twitter example, we need to build a flow that provides the Map / Reduce flow in real time. For this we use XAP’s Processing and Messaging features collocated with its corresponding data.
Our solution therefore uses 2 modules for persisting and processing data, as follows:
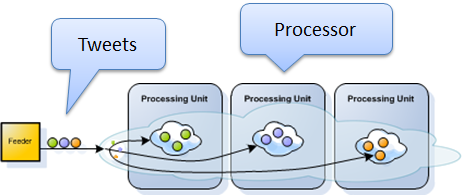
- The feeder module persists raw tweets (the data) in the Space (IMDG)–The feeder partitions the Tweets using their ID (assumed to be globally unique) to achieve a scalable solution with rapid insertion of tweets into the Space.
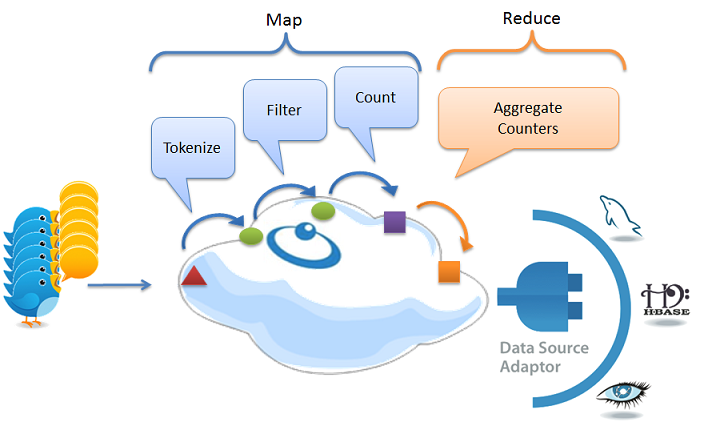
- The processor module implements the Map / Reduce algorithm that processes tweets in the Space, resulting in real-time word counts. The tweets are then moved from the Space to the historical data store located in an Apache Cassandra Big-Data Store –The processor implements a workflow of events using the IMDG ability to store transient data in-memory and trigger processing activity in-memory. The processor’s Map phase has the following logical steps:
- Tokenizes tweets into maps of tokens and writes them to the Space (triggered by the writing of raw tweets to the Space).
- Filters unwanted words from the maps of tokens and writes the filtered maps to the Space (triggered by the writing of maps of tokens to the Space).
- Generates a token counter per word, distributing the counters across the grid partitions for scalability and performance (triggered by the writing of filtered maps of tokens to the Space).
The processor’s Reduce phase aggregates the local results into global word counters.
Implementing the Solution
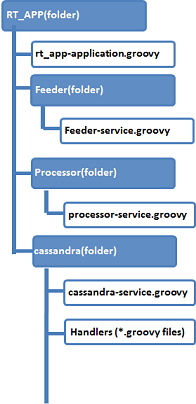
To implement our solution, we use Cassandra (or a local file) as the historical data tier and build a XAP application that processes and persists the data in real-time using the following modules:
The processor module is a XAP processing unit that contains the Space and performs the real-time workflow of processing the incoming tweets. The processing of data objects is performed using event containers.
The feeder module is implemented as a processing unit thereby enabling the dynamic deployment of multiple instances of the feeder across multiple nodes, increasing the load it can manage, and thus the ability handle larger tweet streams. The processing unit contains the following feeder strategies:
- The TwitterHomeTimelineFeederTask class, which feeds in tweets from Twitter’s public timeline using Spring Social, converting them to a canonical Space Document representation, and writes them to the Space ,which in turn invokes the relevant event processors of the processor module.
- The ListBasedFeederTask class is a simulation feeder for testing purposes, which simulates tweets locally, avoiding the need to connect to the Twitter API over the Internet.
Optionally, the common module for including items that are shared between the feeder and the processor modules (e.g. common interfaces, shared data model, etc.).
The bigDataApp directory contains the recipes and other scripts required to automatically deploy, monitor and manage the entire application together with the Cassandra back-end using Cloudify.
Building the Application
The following are step-by-step instructions building the application:
Follow these instructions to download and install the latest version of XAP.
Getting the Application The application source can be found under
<XapInstallationRoot>/recipes/apps/streaming-bigdata folder.
Alternatively, you can download the source files in zip format from the repository home on github The source are maintained in Github Gigaspaces cloudify-recipes repository. If you’re a github user and have already setup the github client, you can fork the repository and clone it to your local machine, as follows:
cd <project root directory>
git clone --branch=2_5_1 <your new repository URL>
We welcome your contributions and suggestions for improvements, and invite you to submit them by performing a pull request. We will review your recommendations and have relevant changes merged.
- Install Maven and the GigaSpaces Maven plug-in The application uses Apache Maven. If you don’t have Apache Maven installed, please download and install it. Once installed:
- Set the
MVN_HOMEenvironment variable - Add
$MVN_HOME/binto your path. - Run the GigaSpaces Maven plug-in installer by calling the
<XapInstallationRoot>/tools/maven/installmavenrep.bat/shscript.
- Building the Application
Move to the
<applicationRoot>folder (contains the application’s project files). xap-version Edit the pom.xml file and make sure theinclude the correct XAP release you have installed. For example if you have XAP 10.0 installed you should have the following:
<properties>
maven-version
    <gsVersion>10.0.1-11800-RELEASE</gsVersion>
</properties>
To Build the project type the following at your command (Windows) or shell (*nix):
mvn install
If you are getting No gslicense.xml license file was found in current directory error, please run the following:
mvn package -DargLine="-Dcom.gs.home="<XapInstallationRoot>"
Where XapInstallationRoot should be XAP root folder - example:
gshome-directory
mvn package -DargLine="-Dcom.gs.home="c:/gigaspaces-xap-premium-10.0.1-ga"
The Maven build will download the required dependencies, compile the source files, run the unit tests, and build the required jar files. In our example, the following processing unit jar files are built:
<project root>/feeder/target/rt-feeder-XAP-9.x.jar<project root>/processor/target/rt-processor-XAP-9.x.jar
Once the build is complete, a summary message similar to the following is displayed:
[INFO] ------------------------------------------------------------------------
[INFO] Reactor Summary:
[INFO]
[INFO] rt-analytics ...................................... SUCCESS [0.001s]
[INFO] rt-common ......................................... SUCCESS [2.196s]
[INFO] rt-processor ...................................... SUCCESS [11.301s]
[INFO] rt-feeder ......................................... SUCCESS [3.102s]
[INFO] ------------------------------------------------------------------------
[INFO] BUILD SUCCESS
[INFO] ------------------------------------------------------------------------
[INFO] Total time: 16.768s
[INFO] Finished at: Sun May 13 13:38:06 IDT 2012
[INFO] Final Memory: 14M/81M
[INFO] ------------------------------------------------------------------------
Running and Debugging the Application within an IDE
Since the application is a Maven project, you can load it using your Java IDE and thus automatically configure all module and classpath configurations.
- With IntelliJ, simply click “File -> Open Project” and point to
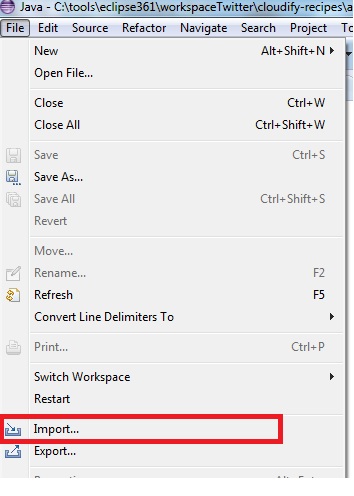
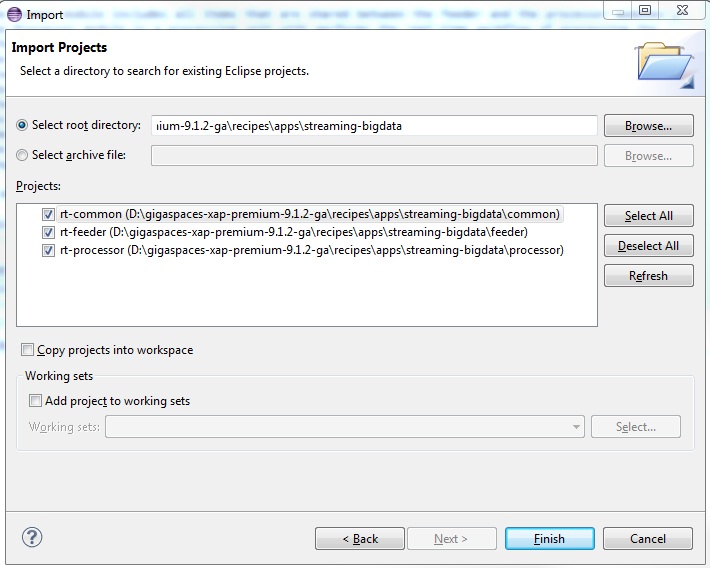
<applicationRoot>/pom.xml. IntelliJ will load the project and present the modules for you. - With Eclipse, install the M2Eclipse plugin and click “File -> Import” , “Maven -> Existing Maven Projects” , select the
streaming-bigdatafolder and click theFinishbutton.

Once the project is loaded in your IDE, you can run the application, as follows:
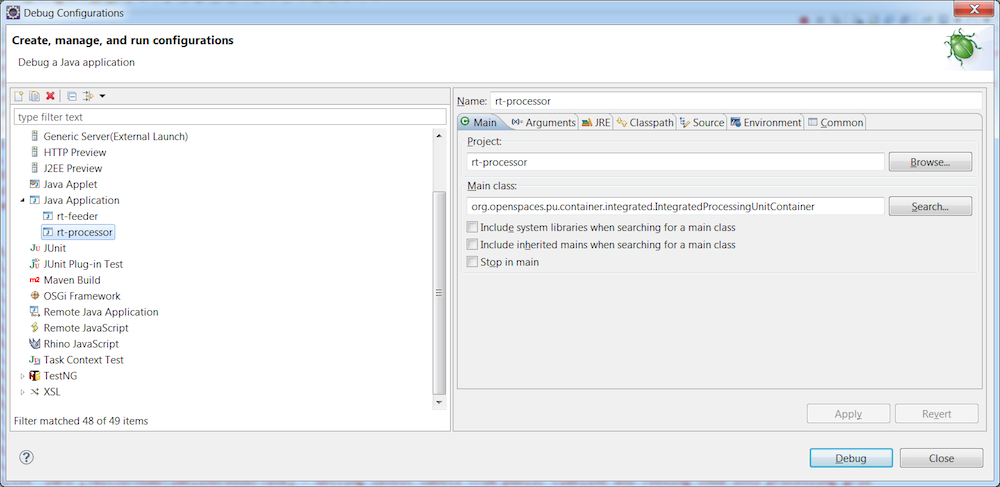
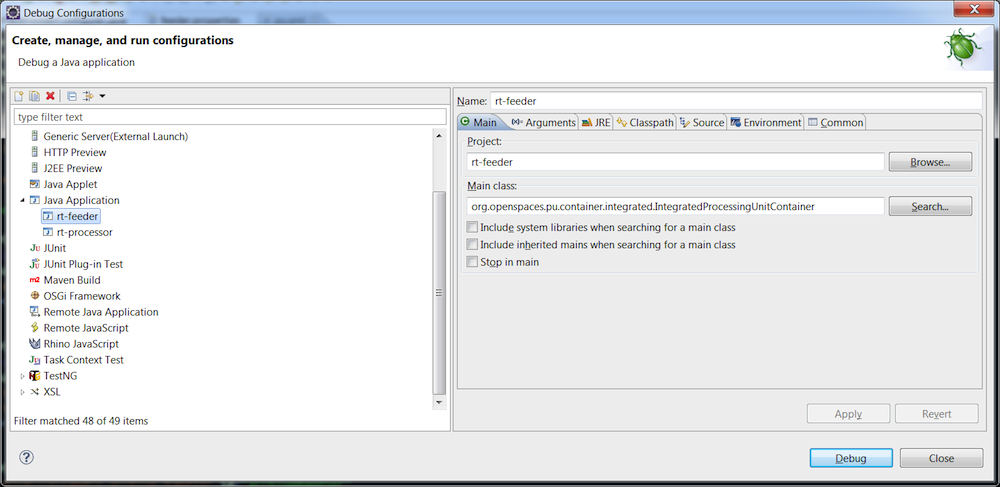
- In Eclipse, create two run configurations. One for the feeder and one for the processor. For both, the main class must be IntegratedProcessingUnitContainer.
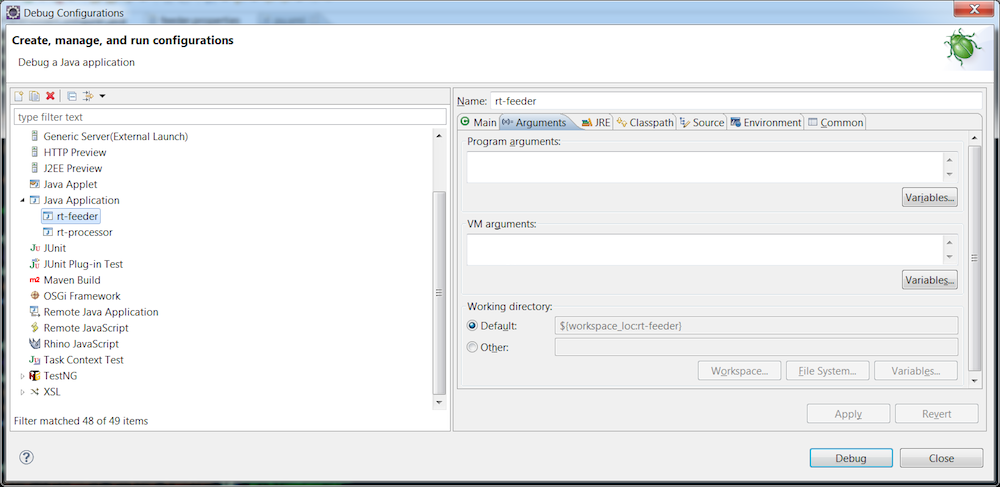
Configure the GigaSpaces home folder using the com.gs.home system property:
gshome-directory
-Dcom.gs.home="c:\gigaspaces-xap-premium-10.0.1-ga"Configure the active spring profiles using the spring.profiles.active system property:-Dspring.profiles.active=list-feeder,file-archiver
rt-processor project run configuration:

rt-feeder project run configuration:
- In IntelliJ, create two run configurations, with IntegratedProcessingUnitContainer as the main class, and make sure that the feeder configuration uses the classpath of the
feedermodule, and that the processor configuration uses that of theprocessormodule.
For more information about the IntegratedProcessingUnitContainer class (runs the processing units within your IDE), see Running and Debugging Within Your IDE.
Make sure you have updated gslicense.xml located under the GigaSpaces XAP root folder with the license key provided as part of the email sent to you after downloading GigaSpaces XAP.
To run the application, run the processor configuration, and then the feeder configuration. An output similar to the following is displayed:
2013-02-22 13:09:38,524  INFO [org.openspaces.bigdata.processor.TokenFilter] - filtering tweet 305016632265297920
2013-02-22 13:09:38,526  INFO [org.openspaces.bigdata.processor.FileArchiveOperationHandler] - Writing 1 object(s) to File
2013-02-22 13:09:38,534  INFO [org.openspaces.bigdata.processor.TweetArchiveFilter] - Archived tweet 305016632265297920
2013-02-22 13:09:38,535  INFO [org.openspaces.bigdata.processor.LocalTokenCounter] - local counting of a bulk of 1 tweets
2013-02-22 13:09:38,537  INFO [org.openspaces.bigdata.processor.LocalTokenCounter] - writing 12 TokenCounters across the cluster
2013-02-22 13:09:38,558  INFO [org.openspaces.bigdata.processor.GlobalTokenCounter] - Increment  local token arrive by 1
2013-02-22 13:09:38,606  INFO [org.openspaces.bigdata.processor.GlobalTokenCounter] - Increment  local token Reine by 1
2013-02-22 13:09:38,622  INFO [org.openspaces.bigdata.processor.GlobalTokenCounter] - Increment  local token pute by 1
2013-02-22 13:09:38,624  INFO [org.openspaces.bigdata.processor.GlobalTokenCounter] - Increment  local token lyc?e by 2
2013-02-22 13:09:41,432  INFO [org.openspaces.bigdata.processor.TweetParser] - parsing tweet SpaceDocument .....
2013-02-22 13:09:41,440  INFO [org.openspaces.bigdata.processor.TokenFilter] - filtering tweet 305016630734381057
2013-02-22 13:09:41,441  INFO [org.openspaces.bigdata.processor.FileArchiveOperationHandler] - Writing 1 object(s) to File
2013-02-22 13:09:41,447  INFO [org.openspaces.bigdata.processor.LocalTokenCounter] - local counting of a bulk of 1 tweets
2013-02-22 13:09:41,448  INFO [org.openspaces.bigdata.processor.LocalTokenCounter] - writing 11 TokenCounters across the cluster
2013-02-22 13:09:41,454  INFO [org.openspaces.bigdata.processor.TweetArchiveFilter] - Archived tweet 305016630734381057
2013-02-22 13:09:41,463  INFO [org.openspaces.bigdata.processor.GlobalTokenCounter] - Increment  local token Accounts by 1
2013-02-22 13:09:41,485  INFO [org.openspaces.bigdata.processor.GlobalTokenCounter] - Increment  local token job by 1
2013-02-22 13:09:41,487  INFO [org.openspaces.bigdata.processor.GlobalTokenCounter] - Increment  local token time by 1
Switching between Online Feeder and the Test Feeder
You can switch between the On-Line TwitterHomeTimelineFeederTask Feeder and the Test ListBasedFeederTask Feeder. The former uses real-time Twitter time line data, while the latter uses simulated tweet data. By default, ListBasedFeederTask is enabled. To switch to TwitterHomeTimelineFeederTask
- add
-Dspring.profiles.active=twitter-feeder -Dtwitter.screenName=diggupdatesto the rt-feeder project VM arguments configuration. - Get your twitter API secret keys:
- Log in to http://dev.twitter.com/
- Go to My applications and
Create a new Application - Copy the
Consumer KeyandConsumer Secretto feeder.properties - Click the
My Access Tokenbutton on bottom of the page. - Copy the
Access TokenandAccess Token Secretto feeder.properties
Since the Twitter API uses rate limiting, the twitter feeder is configured to poll once every 24 seconds (150 requests per hour) -Dtwitter.delayInMs=24000. Your feeder might stop if this rate limit is exceeded.
Running the Application with XAP Runtime Environment
The following are step-by-step instructions for running the application in XAP:
- Download and install XAP.
- Edit
<XapInstallationRoot>/gslicense.xml>and place the license key file provided with the email sent to you after downloading GigaSpaces XAP as the<licensekey>value. - Start a shell prompt in the
<XapInstallationRoot>/recipes/apps/streaming-bigdatafolder. - Run
mvn package
to compile and package the source code into JARs
Step 1: Change to the <XapInstallationRoot>/bin> folder.
Step 2: Choose between the twitter-feeder and the list-feeder spring profile (All tweets are persisted to a file-archiver, cassandra-archiver is explained next):
export GSC_JAVA_OPTIONS="-Dspring.profiles.active=twitter-feeder,file-archiver"
export GSC_JAVA_OPTIONS="-Dspring.profiles.active=list-feeder,file-archiver"
set GSC_JAVA_OPTIONS=-Dspring.profiles.active=twitter-feeder,file-archiver
set GSC_JAVA_OPTIONS=-Dspring.profiles.active=list-feeder,file-archiver
Step 3: Start a Grid Service Agent by running the gs-agent.sh/bat script. This will start two GSCs (GSCs are the container JVMs for your processing units) and a GSM.
nohup ./gs-agent.sh >/dev/null 2>&1
start /min gs-agent.bat
Step 4: Then deploy the processor
./gs.sh deploy ../recipes/apps/streaming-bigdata/bigDataApp/processor/rt-analytics-processor.jar
gs deploy ..\recipes\apps\streaming-bigdata\bigDataApp\processor\rt-analytics-processor.jar
You should see the following output:
default-lookup-group
Deploying [rt-analytics-processor.jar] with name [rt-processor-XAP-10.0] under groups [gigaspaces-10.0.1-XAPPremium-ga] under groups [gigaspaces-10.0.1-XAPPremium-ga] and locators []
Uploading [rt-analytics-processor] to [http://127.0.0.1:61765/]
Waiting indefinitely for [4] processing unit instances to be deployed...
[rt-analytics-processor] [1] deployed successfully on [127.0.0.1]
[rt-analytics-processor] [1] deployed successfully on [127.0.0.1]
[rt-analytics-processor] [2] deployed successfully on [127.0.0.1]
[rt-analytics-processor] [2] deployed successfully on [127.0.0.1]
Finished deploying [4] processing unit instances
Step 5: Next, deploy the feeder:
./gs.sh deploy ../recipes/apps/streaming-bigdata/bigDataApp/feeder/rt-analytics-feeder.jar
gs deploy ..\recipes\apps\streaming-bigdata\bigDataApp\feeder\rt-analytics-feeder.jar
You will need XAP PREMIUM edition license key to deploy the processor in a clustered configuration
You should see the following output:
default-lookup-group
Deploying [rt-analytics-feeder.jar] with name [rt-analytics-feeder] under groups [gigaspaces-10.0.1-XAPPremium-ga] and locators []
Uploading [rt-analytics-feeder] to [http://127.0.0.1:61765/]
SLA Not Found in PU.  Using Default SLA.
Waiting indefinitely for [1] processing unit instances to be deployed...
[rt-analytics-feeder] [1] deployed successfully on [127.0.0.1]
Finished deploying [1] processing unit instances
Once the application is running, you can use the XAP UI tools to view your application , access the data and the counters and manage the application:
- For the Web Based UI run gs-webui.bat/sh and point your browser to
localhost:8099 - For the Rich Based UI run gs-ui.bat/sh
To learn about additional options for deploying your XAP processing units, please see Deploying onto the Service Grid
Viewing Most Popular Words on Twitter
To view the most popular words on Twitter , start the GS-UI using the gs-ui.bat/sh , click the Query icon as demonstrated below and execute the following SQL Query by clicking the  button:
select uid,* from org.openspaces.bigdata.common.counters.GlobalCounter order by counter DESC
You should see the top most popular words on twitter ordered by their popularity:
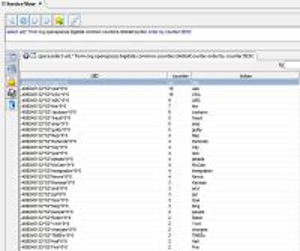
You can re-execute the query just by clicking the  button again. This will give you real-time view on the most popular words on Twitter.
Persisting to Cassandra
Once raw tweets are processed, they are moved from the Space to the historical data backend store. By default, this points to a simple flat file archiver storage implemented with the FileArchiveOperationHandler. The example application also includes a Cassandra driver CassandraArchiveHandler.
For more advanced persistency implementation see the Cassandra Space Persistency Solution.
The next section uses cloudify to automate the manual steps described below
The following are step-by-step instructions configuring the application to persist to Cassandra:
- Download, install, and start the Cassandra database. For more information, see Cassandra’s Getting Started page.
- Define the TWITTER cassandra keyspace by running the following shell command:
<cassandra home>/bin/cassandra-cli --host <cassandra host name> --file <project home>/bigDataApp/cassandra/cassandraKeyspace.txt
- Deploy the processor and feeder
- Start the Grid Components as described in the previous section. Do not deploy the application just yet. We need to start cassandra first.
We need to teardown the existing application since we injected the spring profile using environment variables that affect all Grid components.
Notice how this time we use the
cassandra-archiverprofile (instead of thefile-archiver profile).
./gs.sh gsa shutdown
export GSC_JAVA_OPTIONS="-Dspring.profiles.active=twitter-feeder,cassandra-archiver -Dcassandra.hosts=127.0.0.1"
nohup ./gs-agent.sh >/dev/null 2>&1
./gs.sh deploy ../recipes/apps/streaming-bigdata/bigDataApp/processor/rt-analytics-processor.jar
./gs.sh deploy ../recipes/apps/streaming-bigdata/bigDataApp/feeder/rt-analytics-feeder.jar
gs.bat gsa shutdown
set GSC_JAVA_OPTIONS=-Dspring.profiles.active=twitter-feeder,cassandra-archiver -Dcassandra.hosts=127.0.0.1
start /min gs-agent.bat
gs deploy ..\recipes\apps\streaming-bigdata\bigDataApp\processor\rt-analytics-processor.jar
gs deploy ..\recipes\apps\streaming-bigdata\bigDataApp\feeder\rt-analytics-feeder.jar
- You can view the data within Cassandra using the Tweet column family - Move to the Cassandra
binfolder and run thecassandra-clicommand:
>cassandra-cli.bat
[default@unknown] connect localhost/9160;
[default@unknown] use TWITTER;
[default@TWITTER] list Tweet;
-------------------
RowKey: 0439486840025000
=> (column=Archived, value=00000000, timestamp=1361398666863002)
=> (column=CreatedAt, value=0000013cf9aea1c8, timestamp=1361398666863004)
=> (column=FromUserId, value=0000000039137bb7, timestamp=1361398666863003)
=> (column=Processed, value=01, timestamp=1361398666863001)
=> (column=Text, value=405f5f4c6f7665526562656c64652073656775696e646f2021205573613f20234172746875724d65754d61696, timestamp=136139866
6863000)
...
Running the Example using Cloudify
To run the application with the Cassandra DB as one application on any cloud, we will use Cloudify. A key concept with Cloudify is deploying and managing the entire application life cycle using a Recipe. This approach provides total application life-cycle automation without any code or architecture change. Furthermore, it is cloud neutral so you don’t get locked-in to a specific cloud vendor.
The following snippet shows the application’s recipe:
application {
    name="big_data_app"

    service {
        name = "feeder"
        dependsOn = ["processor"]
    }
    service {
        name = "processor"
        dependsOn = ["cassandra"]
    }
    service {
        name = "cassandra"
    }
}
The following snippet shows the life-cycle events described in the Cassandra service recipe:
service {
  name "rt_cassandra"
  icon "Apache-cassandra-icon.png"
  numInstances 1
  type "NOSQL_DB"
  lifecycle{
        init        "cassandra_install.groovy"
        preStart    "cassandra_prestart.groovy"
        start       "cassandra_start.groovy"
        postStart   "cassandra_poststart.groovy"

    }
...
}
The following snippet shows the processing unit described in the processor recipe:
service {
    name "processor"
    numInstances 4
    maxAllowedInstances 4
    statefulProcessingUnit {
        binaries "rt-analytics-processor.jar"
        springProfilesActive "cassandra-archiver,cassandra-discovery"
        sla {
            memoryCapacity 512
            maxMemoryCapacity 512
            highlyAvailable true
            memoryCapacityPerContainer 128
        }
    }
}
The application recipe is packaged, as follows:
Testing the application on a Local Cloud
XAP comes with a cloud emulator called localcloud. It allows you to test the recipe execution on your local machine. Follo these step-by-step instructions to installing and run the application on the localcloud:
- Move to the
/tools/cli/ folder, and at the command (Windows) prompt, type: cloudify.bat(or at the shell *nix prompt, type:cloudify.sh). - To start the localcloud services, at the prompt, type
bootstrap-localcloud. This may take few minutes. - To deploy the application, at the prompt, type:
install-application <XapInstallationRoot>/recipes/apps/streaming-bigdata/bigDataApp
You can track the progress on the shell and on the web management console (localhost:8099).
For more information, see Deploying Applications page.
Running on Clouds
To run the application on one of the supported clouds, proceed the following steps:
- Configure the cloud driver configuration file and get the cloud certificate. For more information, see Post-Installation Configuration page.
- Bootstrap the cloud.
- To install and deploy the application, use the
install-applicationcommand, as described in the previous section.
In order to use your license on the cloud environment you should perform the following:
- cd to
<XAP installation root>/tools/cli/plugins/ecs/<cloud name>/upload - create directory cloudify-overrides
- copy your license(
/gslicense.xml) to the above directory.