SpaceDeck – Configuring Transformations
Refer to Transformations for a detailed overview.
Adding a Transformation
After completing the steps of adding tables to a pipeline (see setting up tables), click edit next to a table name:
![]()
This Configuration screen will be displayed. Click Add Transformation, to start the process of configuring Transformations:
![]()
Transformation Type: Calculated Column
![]()
1: Provide a name for the Transformation
2. Select Transformation Type: Calculated Column
3. Type the name of the columns to include.
4. Each transformation must be validated before adding the next. If there are multiple validations, they must all be validate alone and against each other.
5. Once validation is successful, Transformation Validated will be displayed.
6. Click this to add another transformation if required.
Transformation Type: Filter
![]()
1: Provide a name for the Transformation.
2. Select Transformation Type: Filter.
3. Populate with the filter - an example is provided.
4. Each transformation must be validated before adding the next. If there are multiple validations, they must all be validate alone and against each other.
5. Once validation is successful, Transformation Validated will be displayed.
6. The new column that was added through the first transformation is displayed here.
7. Click this to add another transformation if required.
Transformation Type: Rest API
![]()
1: Provide a name for the Transformation
2. Select Transformation Type: Filter
3. Insert the URL of the External REST![]() REpresentational State Transfer. Application Programming Interface
An API, or application programming interface, is a set of rules that define how applications or devices can connect to and communicate with each other. A REST API is an API that conforms to the design principles of the REST, or representational state transfer architectural style. service configuration file
REpresentational State Transfer. Application Programming Interface
An API, or application programming interface, is a set of rules that define how applications or devices can connect to and communicate with each other. A REST API is an API that conforms to the design principles of the REST, or representational state transfer architectural style. service configuration file
4. To download the external file, click Download
5. Once validation is successful, Transformation Validated will be displayed.
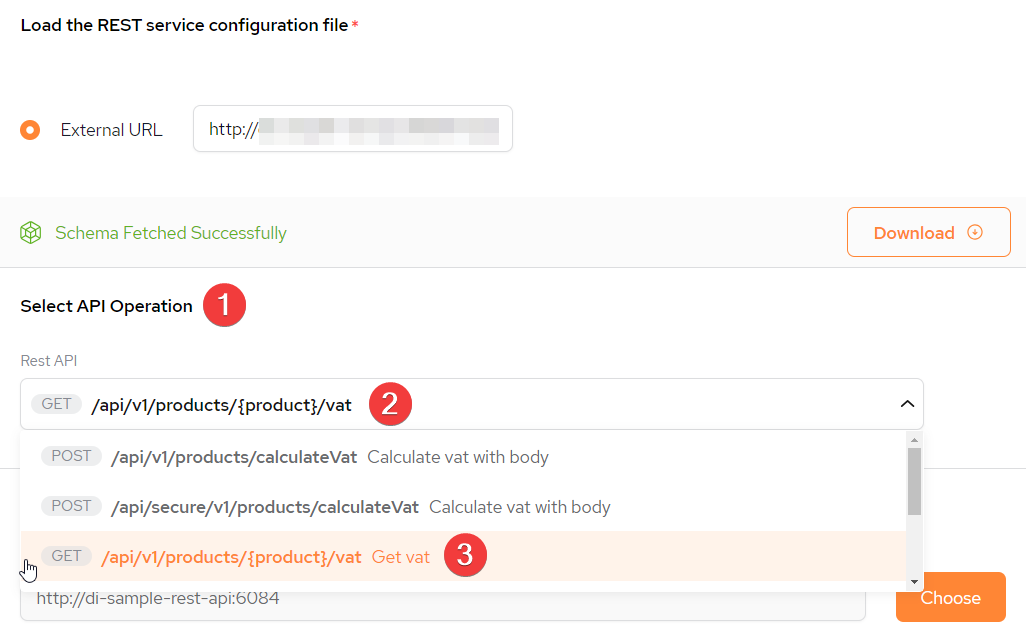
Select API Operation
![]()
1: From the imported schema select an API Function.
2. From the drop-down select the API Operation.
3. In this example, a POST function is selected.
Select Server
![]()
1: From the main Transformation setup menu, click Choose.
2. Select the server.
3. Click Apply.
POST: Request Body
![]()
1: POST function previously selected
2. Server previously selected
3. Provide the Input Request Body (there is a default example provided). This is mandatory.
The user should update the input request body to use real values from the table instead of the default values provided.
The user should update the input request body to use real values from the table instead of the default values provided.
Example: {"product": "${PRODUCT_NAME}","price": ${PRICE}}
The use of the $ denotes a placeholder for columns from the table. It will be substituted by the value in the actual column.
POST: Select and Define Columns
![]()
1: Select Columns From Response.
2. Define Table Columns Value.
3. Define the Type.
4. The is the JSON Path.
GET: Request Body
1: From the imported schema select an API Function.
2. From the drop-down select the API Operation.
3. In this example, a GET function is selected.
POST: Select and Define Columns
![]()
1: Define the API parameters
2. Click for Advanced Settings (see below).
3. Select columns for response.
3. Define table column values.
Advanced Settings:
These are used to provide global parameters for REST transformations.
![]()
Advanced Settings Parameters
-
Authorization – Used to specify authentication credentials that will be passed in “Authorization” header of http request, for example “Bearer <bearer-token>.
-
Execution mode - Allows to chose between synchronous and Thread pool (asynchronous) mode. Later allows execution of multiple rest requests simultaneously increasing throughput of rest transformation.
-
Thread pool size – This is used in thread pool mode to control parallelism.
-
Timeout in millis - Specifies maximum time allowed for request, If failed request will be retried up to “Number of retries” times.
-
Number of retries - Define the number of retries.
-
Include http status - If “Include http status” is enabled then “http status column name” will be added to the resulting table with status code of REST API
 REpresentational State Transfer. Application Programming Interface
An API, or application programming interface, is a set of rules that define how applications or devices can connect to and communicate with each other. A REST API is an API that conforms to the design principles of the REST, or representational state transfer architectural style..
REpresentational State Transfer. Application Programming Interface
An API, or application programming interface, is a set of rules that define how applications or devices can connect to and communicate with each other. A REST API is an API that conforms to the design principles of the REST, or representational state transfer architectural style.. -
Http status column name - If “Include http status” is enabled then “http status column name” will be added to the resulting table with status code of REST API.
Complete the Transformation Setup
Close Setup
![]()
Once all the Transformations have been validated click Close from the top of the Transformations setup screen.
If you do not apply the Transformations, it is still possible to edit them.
Apply Transformations
![]()
1: List of all configured Transformations.
2. Click Apply
Save Table
Save the table. Refer to setting up tables for the instructions.