Installation Procedure for GigaSpaces Smart DIH Using ODSX
This document describes basic operational procedures for installing GigaSpaces Smart DIH, including the Tiered Storage![]() Smart DIH allows enterprises to develop and deploy digital services in an agile manner, without disturbing core business applications. This is achieved by creating an event-driven, highly performing, efficient and available replica of the data from multiple systems and applications,
Smart DIH allows enterprises to develop and deploy digital services in an agile manner, without disturbing core business applications. This is achieved by creating an event-driven, highly performing, efficient and available replica of the data from multiple systems and applications,![]() Automatically assigns data to different categories of storage types based on considerations of cost, performance, availability, and recovery. and Data Integration
Automatically assigns data to different categories of storage types based on considerations of cost, performance, availability, and recovery. and Data Integration![]() The Data Integration (DI) layer is a vital part of the Digital Integration Hub (DIH) platform. It is responsible for a wide range of data integration tasks such as ingesting data in batches or streaming data changes. This is performed in real-time from various sources and systems of record (SOR. The data then resides in the In-Memory Data Grid (IMDG), or Space, of the GigaSpaces Smart DIH platform. modules.
The Data Integration (DI) layer is a vital part of the Digital Integration Hub (DIH) platform. It is responsible for a wide range of data integration tasks such as ingesting data in batches or streaming data changes. This is performed in real-time from various sources and systems of record (SOR. The data then resides in the In-Memory Data Grid (IMDG), or Space, of the GigaSpaces Smart DIH platform. modules.
This document is relevant only for the Service Grid![]() A built-in orchestration tool which contains a set of Grid Service Containers (GSCs) managed by a Grid Service Manager. The containers host various deployments of Processing Units and data grids. Each container can be run on a separate physical machine. This orchestration is available for XAP only. environment. For a Kubernetes
A built-in orchestration tool which contains a set of Grid Service Containers (GSCs) managed by a Grid Service Manager. The containers host various deployments of Processing Units and data grids. Each container can be run on a separate physical machine. This orchestration is available for XAP only. environment. For a Kubernetes![]() An open-source container orchestration system for automating software deployment, scaling, and management of containerized applications. environment, see Smart DIH Kubernetes Installation.
An open-source container orchestration system for automating software deployment, scaling, and management of containerized applications. environment, see Smart DIH Kubernetes Installation.
First we install and deploy the basic Smart DIH system:
-
Download the Smart DIH software and place it in the proper directories. The downloaded software includes the
ODSXscript. ODSX allows us to install Smart DIH using a simple CLI-based menu. -
Run the ODSX script to install and deploy a basic Smart DIH installation, including the Tiered Storage module.
Then we add the Data Integration module:
-
Note that the installation of Data Integration is performed manually and is not automated by the ODSX script.
Finally, we Run the ODSX script again, this time to display the status of the Data Integration servers.
What is Smart DIH?
Digital Integration Hub (DIH) is an application architecture that decouples digital applications from the systems of record, and aggregates operational data into a low-latency data fabric. A digital integration hub supports modernization initiatives by offloading from legacy architecture and providing a decoupled API layer that effectively supports modern on-line applications.
For more information on the architecture of DIH, see SmartDIH-Overview.
Architecture
The example DIH architecture referenced in this topic consists of a Pivot server, used for common access to scripts and resouirces, and several DIH servers. The architecture is shown below.

Installing DIH via ODSX – Basic System
This example installs the basic DIH system, including Tiered Storage. For an example using ODSX for the Data Integration module, see Installing DIH via ODSX – Data Integration Module .
Install the ODSX Installation Script
Smart DIH can be installed using an automated script called ODSX. In order to use ODSX, please note the following prerequisites:
- ODSX is supported on RHEL/Centos 7.7.
- ODSX must run as root.
- ODSX should be able to connect to the other machines via ssh passwordless (using a ssh key) as root.
- The Pivot machine should have the following folders:
/dbagigashare- a local folder which contains the sources (installation and configuration files) and is shared (i.e. NFS) with the other dih machines./dbagiga- a local folder (work directory that contains ODSX and DIH)
- Download the latest version of ODSX and DIH sources to
/dbagigashareon the Pivot server. - Extract the tar file to
/dbagigaand create soft links.
For example,
gs-odsx → gs-odsx-3.46-sox-release
gigaspaces-smart-ods → gigaspaces-smart-dih-enterprise-16.2.0-m26-thu-30 - Create a mount point in all the dih machines (except pivot) and configure auto mount
For example,
/dbagigashare to: Pivot:/dbagigashare
In order to download ODSX and DIH sources, please contact Customer Success.
Run the ODSX Installation Script
Prerequisites: Server setup
For this example, we will install using the following servers and IP addresses:
| Number |
Instance Type |
Instance Name |
Private IP |
| 1 |
ODSX — PIVOT |
odsx_demo_pivot |
10.0.0.165 |
| 2 |
Manager1 |
odsx_demo_manager1 |
10.0.0.198 |
| 3 |
Manager2 |
odsx_demo_manager2 |
10.0.0.161 |
| 4 |
Manager3 |
ocisx_demo_manager3 |
10.0.0.36 |
| 5 |
Space1 |
odsx_demo_space1 |
10.0.0.247 |
| 6 |
Space2 |
odsx_demo_space2 |
10.0.0.56 |
| 7 |
Space3 |
odsx_demo_space3 |
10.0.0.72 |
| 8 |
odsx_demo_influx_grafana |
10.0.0.82 |
Server 1 – Pivot server, containing shared files and the ODSX script
Servers 2, 3, 4 – Managers
Servers 5, 6, 7 – Space![]() Where GigaSpaces data is stored. It is the logical cache that holds data objects in memory and might also hold them in layered in tiering. Data is hosted from multiple SoRs, consolidated as a unified data model. objects (stateful Processing Units
Where GigaSpaces data is stored. It is the logical cache that holds data objects in memory and might also hold them in layered in tiering. Data is hosted from multiple SoRs, consolidated as a unified data model. objects (stateful Processing Units![]() This is the unit of packaging and deployment in the GigaSpaces Data Grid, and is essentially the main GigaSpaces service. The Processing Unit (PU) itself is typically deployed onto the Service Grid. When a Processing Unit is deployed, a Processing Unit instance is the actual runtime entity.)
This is the unit of packaging and deployment in the GigaSpaces Data Grid, and is essentially the main GigaSpaces service. The Processing Unit (PU) itself is typically deployed onto the Service Grid. When a Processing Unit is deployed, a Processing Unit instance is the actual runtime entity.)
Server 8 – Grafana and InfluxDB, for metrics
Navigate to the Pivot server, install and run the ODSX script
To install the ODSX script, navigate to the scripts folder and run the setup script, logged in as root:
cd gs-odsx/scripts
./setup.sh
Then exit from the terminal and re-login to the Pivot (ODSX) machine.
After connecting to the Pivot server, go to the gs-odsx directory and run the ODSX script:
cd gs-odsx
./odsx.py
The ODSX Menu
The ODSX script presents a structured menu of options and operations, as shown below.
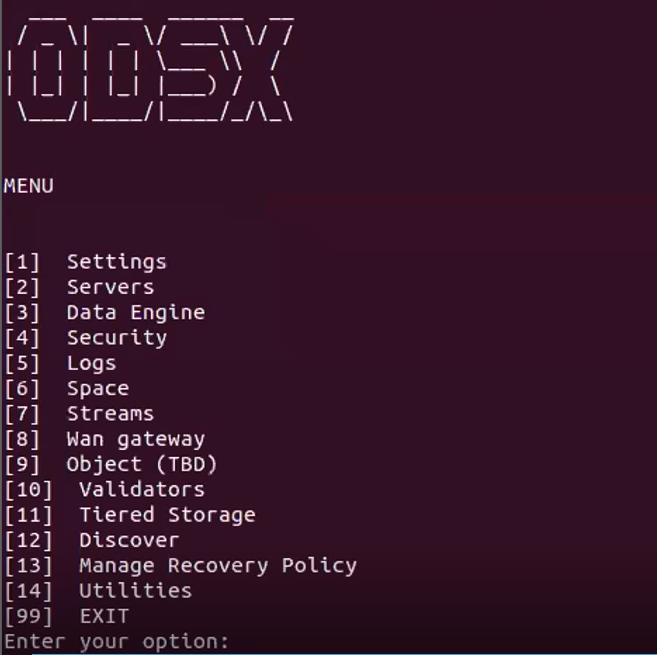
The menu options used in this example as are follows:
[2] Servers – Define and manage servers
[11] Tiered Storage – Manage and update Tiered Storage
View Server Information
The [2] Servers option displays the Servers menu, which allows you to install and manage the servers in the system.
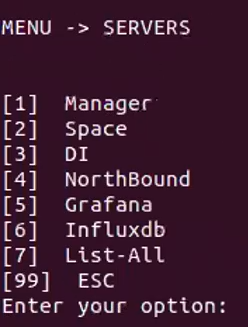
This sub menu allows you to specify actions for a specific server.
Install Grafana
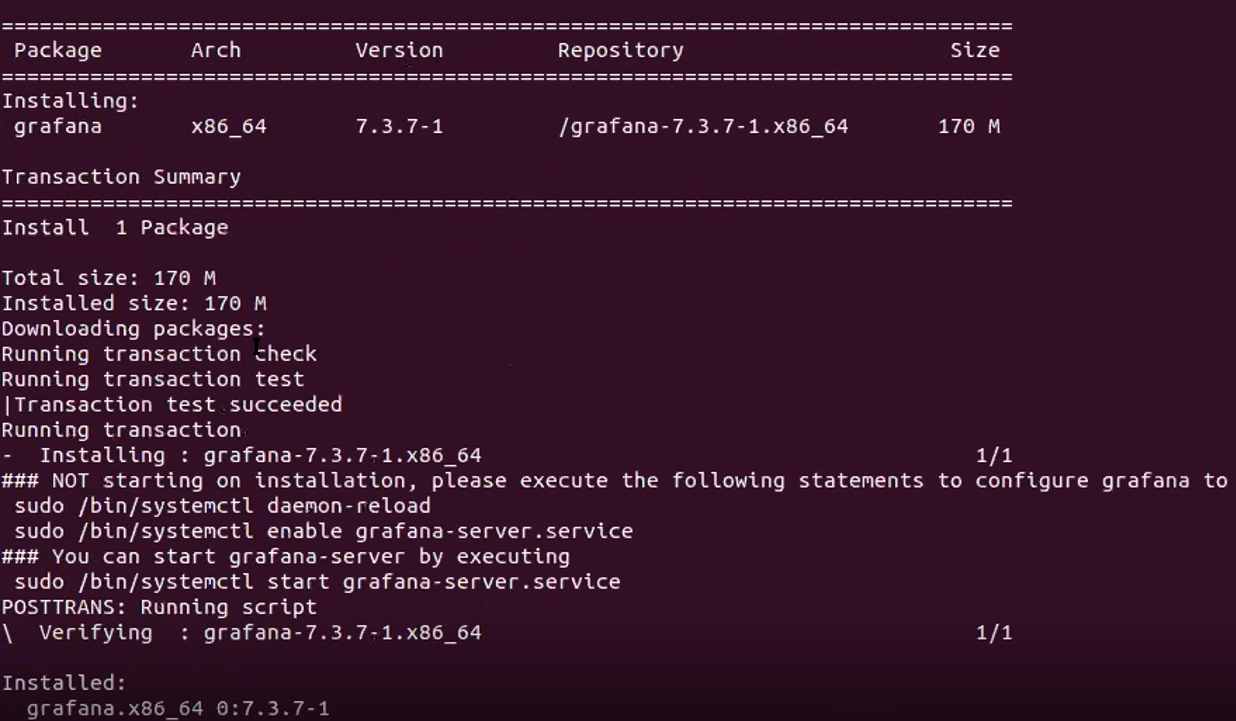
Choose options [2] Servers – [5] Grafana – [1] Install to install Grafana.
When complete, messages similar to the following are displayed:
Choose options [2] Servers – [5] Grafana – [4] List to see the status of the Grafana server.

Start Grafana
Choose options [2] Servers – [5] Grafana – [2] Start to start Grafana. A display similar to the following will appear:

Install InfluxDB
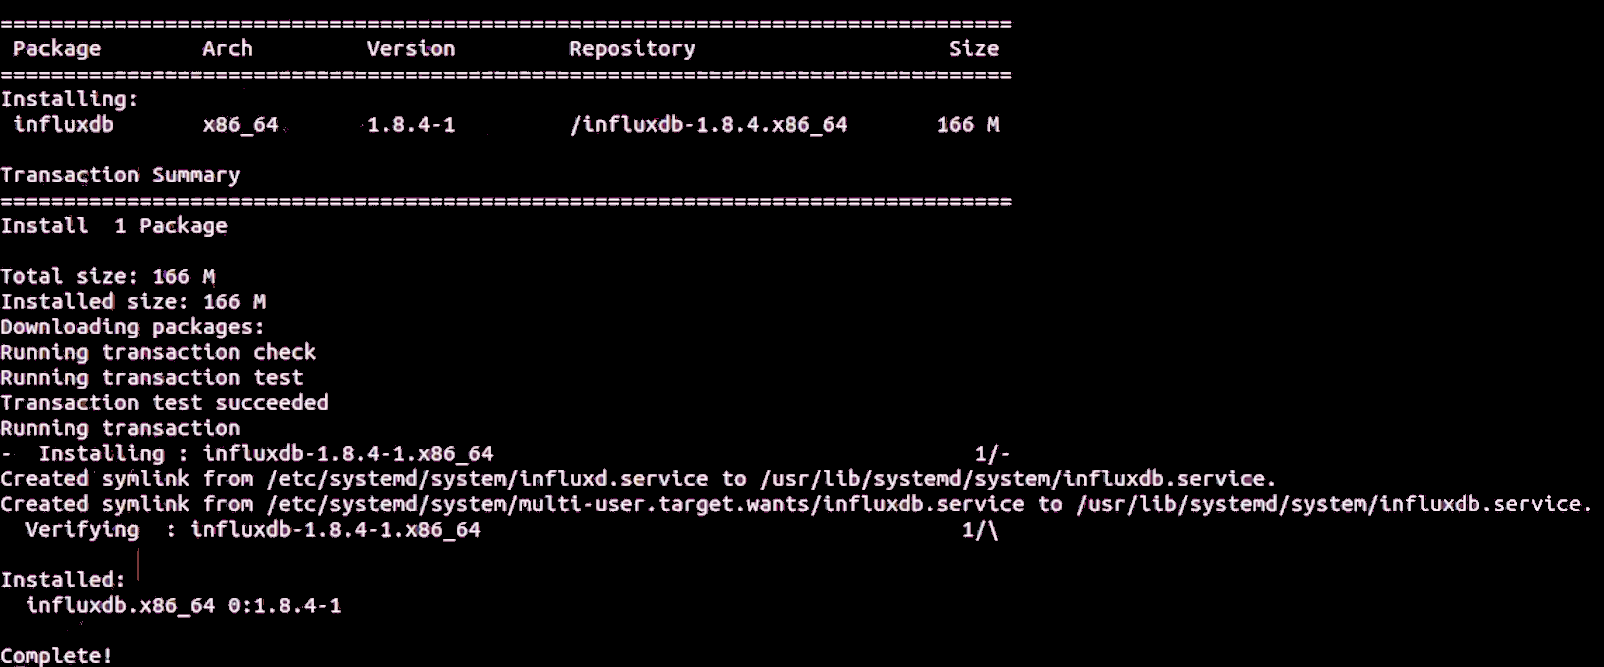
Choose options [2] Servers – [6] Influxdb – [1] Install to install InfluxDB.
When complete, messages similar to the following are displayed:
Install Managers
Choose options [2] Servers – [1] Manager – [1] Install to install the Managers.
The script will show the servers that are to be installed:

When complete, messages similar to the following are displayed:

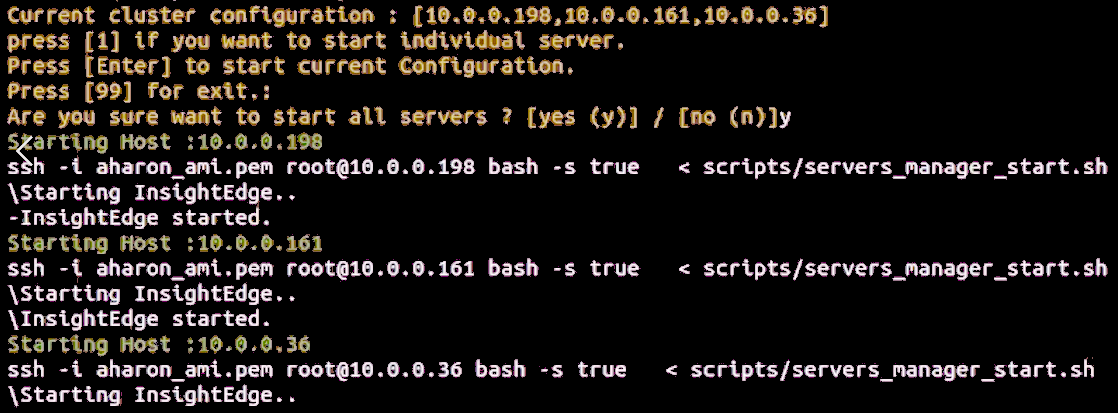
Start Managers
Choose options [2] Servers – [1] Manager – [3] Start to start the Managers.
The script will show information similar to that shown below, as the processing is executing:
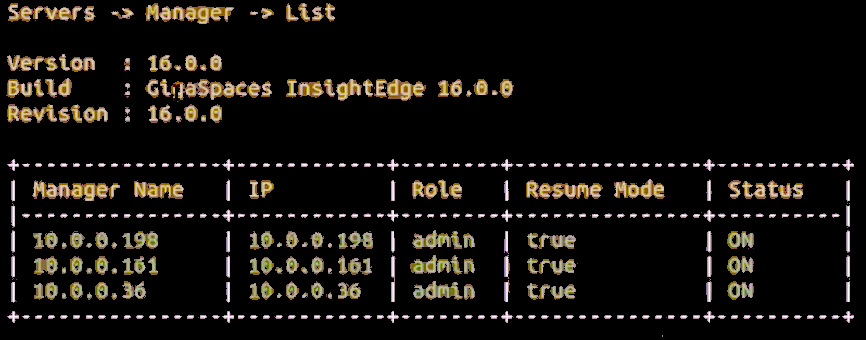
When complete, choose options [2] Servers – [1] Manager – 6] List to see information similar to that shown below.
Install Spaces
Choose options [2] Servers – [2] Space – 1] Install to install the Space servers.
The script will show the current cluster configuration:

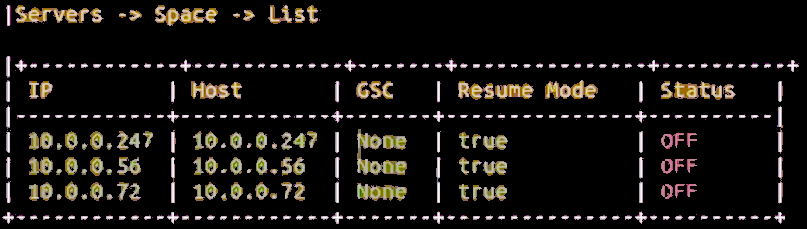
When complete, choose options [2] Servers – [2] Space – 4] List to see information similar to that shown below.
Start Spaces
Choose options [2] Servers – [2] Space – 2] Start to start the Space servers.
The script will show information similar to that shown below, as the processing is executing:
When complete, choose options [2] Servers – 2] Space – 4] List to see information similar to that shown below.
View Spaces with Version Information
Choose options [2] Servers – [2] Space – 6] ListWithVersion to see the list of Space servers with their version information.
The script will show information similar to that shown below, as the processing is executing:

When complete, choose options [2] Servers – 2] Space – 4] List to see information similar to that shown below.
Deploy Tiered Storage
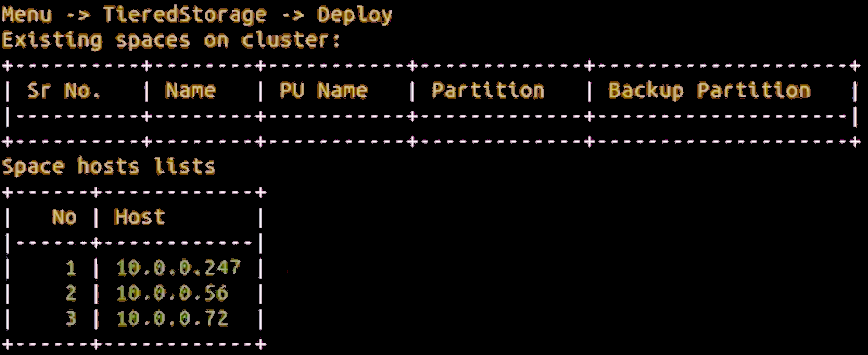
Choose options 11] Tiered Storage – 1] Deploy to deploy Tiered Storage.
In this example, there are no existing Spaces on the cluster with Tiered Storage. Three available Space hosts are also shown.
Enter the requested information as requested by the prompts. Sample information is shown below, including the path to the criteria file for Tiered Storage.
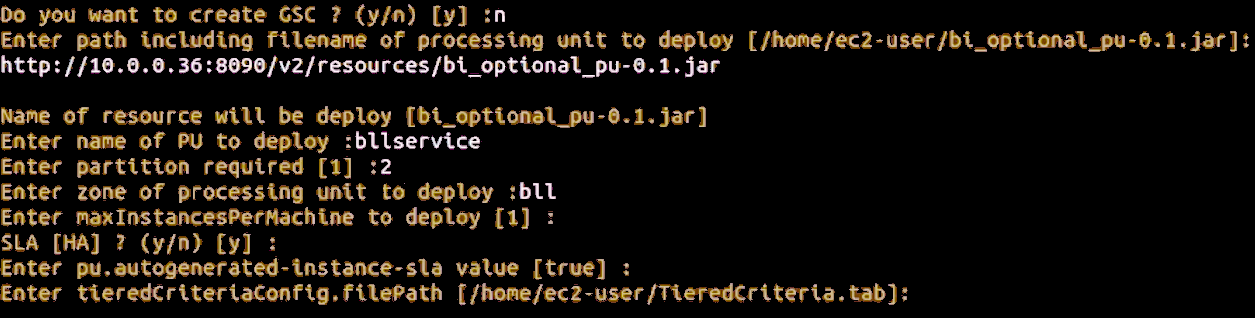
A typical Tiered Storage criteria file is shown below.

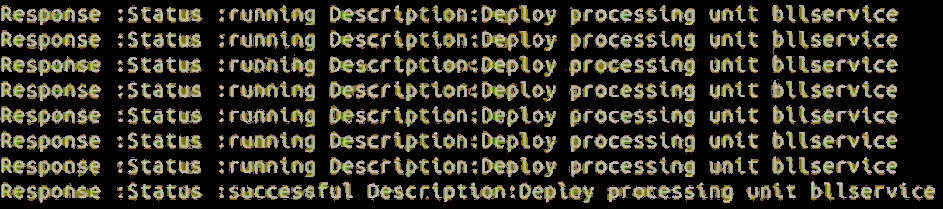
When deployment is complete, a screen similar to the one below will display.
Update Tiered Storage
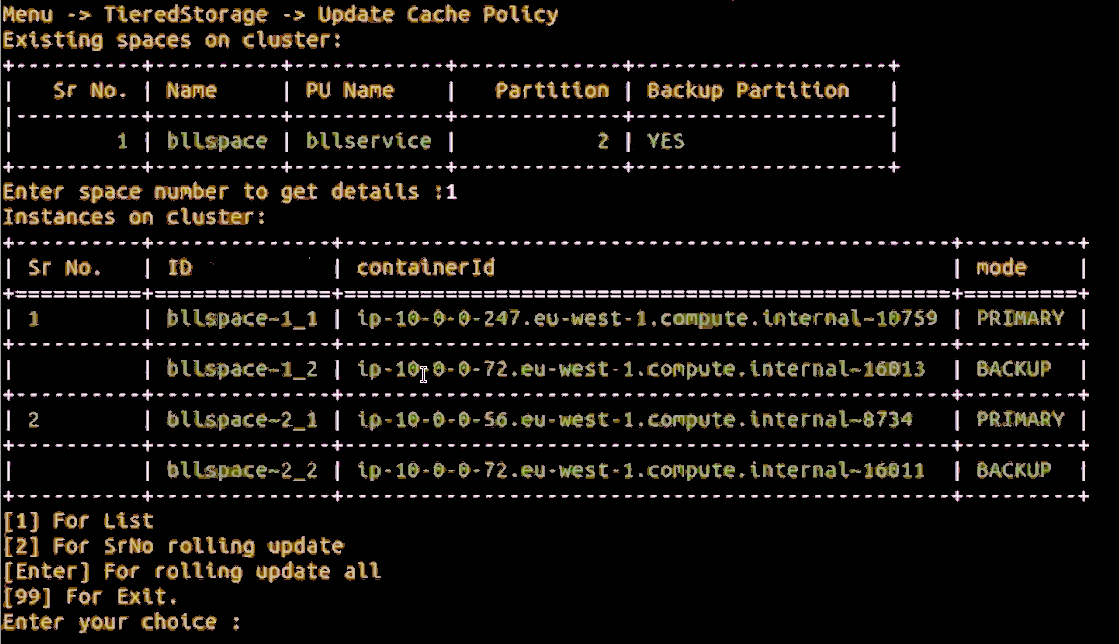
After making changes to the Tiered Storage criteria file, choose options 11] Tiered Storage – 2] UpdateCachePolicy to update Tiered Storage.
You will see a display similar to the example shown below. Note that the upper part of the screen shows the available Spaces. After choosing Space number 1, the instances of that Space are shown. Follow the prompts to continue the process of updating Tiered Storage.
Installing the Data Integration Module
Flink installation
In order to install standalone Flink![]() Apache Flink is an open-source, unified stream-processing and batch-processing framework developed by the Apache Software Foundation. The core of Apache Flink is a distributed streaming data-flow engine written in Java and Scala. Flink executes arbitrary dataflow programs in a data-parallel and pipelined manner. please do the following.
Apache Flink is an open-source, unified stream-processing and batch-processing framework developed by the Apache Software Foundation. The core of Apache Flink is a distributed streaming data-flow engine written in Java and Scala. Flink executes arbitrary dataflow programs in a data-parallel and pipelined manner. please do the following.
1. Flink should be installed on the same server with Kafka![]() Apache Kafka is a distributed event store and stream-processing platform. Apache Kafka is a distributed publish-subscribe messaging system.
A message is any kind of information that is sent from a producer (application that sends the messages) to a consumer (application that receives the messages).
Producers write their messages or data to Kafka topics. These topics are divided into partitions that function like logs.
Each message is written to a partition and has a unique offset, or identifier. Consumers can specify a particular offset point where they can begin to read messages.. Download
Apache Kafka is a distributed event store and stream-processing platform. Apache Kafka is a distributed publish-subscribe messaging system.
A message is any kind of information that is sent from a producer (application that sends the messages) to a consumer (application that receives the messages).
Producers write their messages or data to Kafka topics. These topics are divided into partitions that function like logs.
Each message is written to a partition and has a unique offset, or identifier. Consumers can specify a particular offset point where they can begin to read messages.. Download flink version 1.15.0 from here.
2. As gsods OS user, copy the downloaded tar.gz file to the following directory: /home/gsods/di-flink
If DI![]() The Data Integration (DI) layer is a vital part of the Digital Integration Hub (DIH) platform. It is responsible for a wide range of data integration tasks such as ingesting data in batches or streaming data changes. This is performed in real-time from various sources and systems of record (SOR. The data then resides in the In-Memory Data Grid (IMDG), or Space, of the GigaSpaces Smart DIH platform. software should be installed under the different file system or directory , then create a symbolic link from
The Data Integration (DI) layer is a vital part of the Digital Integration Hub (DIH) platform. It is responsible for a wide range of data integration tasks such as ingesting data in batches or streaming data changes. This is performed in real-time from various sources and systems of record (SOR. The data then resides in the In-Memory Data Grid (IMDG), or Space, of the GigaSpaces Smart DIH platform. software should be installed under the different file system or directory , then create a symbolic link from /home/gsods/di-flink to the new installation directory <alternative directory>/di-flink
3. Unzip and open the downloaded flink archive file:
tar -xzf flink-1.15.0-bin-scala_2.12.tgz4. Create a symbolic link latest-flink to the new flink directory:
ln -s flink-1.15.0 latest-flink5. Start Flink as gsods OS user:
cd  /home/gsods/di-flink/latest-flink/bin
./start-cluster.sh
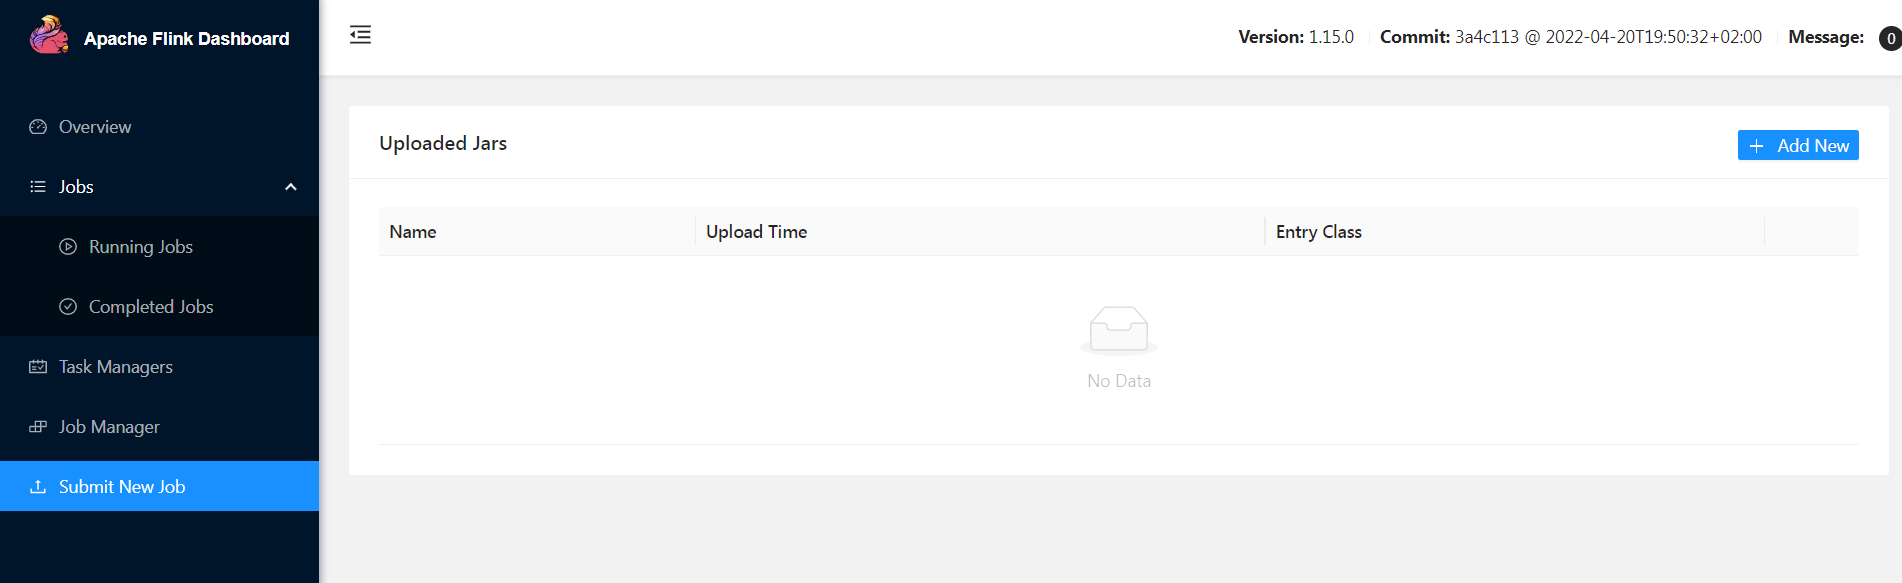
6. Flink UI is started on the port 8081. Connect to Flink UI:
http://<flink server>:8081This is a basic Apache Flink installation. More advanced instructions of a Flink configuration in a cluster mode and flink services configuration will be provided later.
DI Metadata Manager Installation
In order to install DI Metadata Manager first time do the following.
1. Download the latest DI Metadata Manager tar.gz file
2. Create a directory for DI Metadata Manager software as gsods OS user:
mkdir /home/gsods/di-Metadata Manager3. Copy the downloaded tar.gz to the /home/gsods/di-Metadata Manager directory.
4. Change to the /home/gsods/di-Metadata Manager
cd /home/gsods/di-Metadata Manager5. Unzip and open the downloaded di-Metadata Manager archive file
tar -xzf di-Metadata Manager-<version>.tar.gz6. Create a symbolic link latest-di-Metadata Manager to the newly created directory:
ln -s di-Metadata Manager-<version> latest-di-Metadata Manager7. As root OS user, change to the config directory of the di-Metadata Manager
su - root
cd /home/gsods/di-Metadata Manager/latest-di-Metadata Manager/config
8. Copy di-Metadata Manager service file to the systemd services directory (as root OS user)
cp di-Metadata Manager.service /etc/systemd/system9. Reload systemd configuration (as root OS user)
systemctl daemon-reload10. Start di-Metadata Manager service (as root OS user)
systemctl start di-Metadata Manager11. Monitor the log of the di-Metadata Manager (as gsods OS user)
/home/gsods/di-Metadata Manager/latest-di-Metadata Manager/logs/di-Metadata Manager.log12. DI Metadata Manager service is started on a port 6081, check the DI Metadata Manager rest![]() REpresentational State Transfer. Application Programming Interface
An API, or application programming interface, is a set of rules that define how applications or devices can connect to and communicate with each other. A REST API is an API that conforms to the design principles of the REST, or representational state transfer architectural style. service
REpresentational State Transfer. Application Programming Interface
An API, or application programming interface, is a set of rules that define how applications or devices can connect to and communicate with each other. A REST API is an API that conforms to the design principles of the REST, or representational state transfer architectural style. service
http://<di Metadata Manager>:6081/swagger-uiDI Manager installation
In order to install DI Manager first time do the following.
1. Download the latest DI Manager tar.gz file
2. Create a directory for DI Manager software as gsods OS user
mkdir /home/gsods/di-manager3. Copy the downloaded tar.gz to the /home/gsods/di-manager directory
4. Change to the /home/gsods/di-manager directory
cd /home/gsods/di-manager5. Unzip and open the downloaded di-manager archive file
tar -xzf di-manager-<version>.tar.gz6. Create a symbolic link latest-di-manager to the newly created directory
ln -s di-manager-<version> latest-di-manager7. Change the di-manager parameter to point to the correct di-Metadata Manager server (as gsods OS user)
cd  /home/gsods/di-manager/latest-di-manager/config
vi di-manager-application.properties
8. Change Metadata Manager.server.url to point to the Metadata Manager server
Avoid using localhost but the actual hostname where Metadata Manager is running. Usually DI-Metadata Manager and DI-Manager will be running on the same host.
9. As root OS user change to the configdirectory of the di-manager
su - root
cd /home/gsods/di-manager/latest-di-manager/config
10. Copy the di-manager service file to the systemd services directory (as root OS user)
cp di-manager.service /etc/systemd/system11. Reload systemd configuration (as root OS user)
systemctl daemon-reload12. Start the di-manager service (as root OS user)
systemctl start di-manager13. Monitor the log of the di-manager (as gsods OS user)
/home/gsods/di-manager/latest-di-manager/logs/di-manager.log14. DI Manager service is started on port 6080, check the DI Manager rest service
http://<di manager host>:6080/swagger-uiDI packages - upgrade procedure
In order to install new DI package please do the following.
1. Via postman stop active pipelines
2. As gsods OS user, download the new DI package (di-mdm or di-manager) to the /home/gsods/<DI component>
3. For di-mdm, download the new tar.gz package to the /home/gsods/di-mdm directory
4. For the di-manager, download the new tar.gz package to the /home/gsods/di-manager directory
5. As gsods OS user, unzip / untar the newly downloaded package
tar -xzf <new tar file>6. For di-mdm do the following manual steps as gsodsOS user:
cd /home/gsods/di-mdm/<new package>/lib
cp  /home/gsods/di-mdm/latest-di-mdm/lib/sqlitesample.db .
7. For di-manager do the following manual step as gsods OS user:
tar -xzf di-manager-<version>.tar.gzcd /home/gsods/di-manager/<new package>/config
cp /home/gsods/di-manager/latest-di-manager/config/di-manager-application.properties .The two manual steps shown above will be automated in a future release.
8. As root OS user do the following:
9. Go to the utils directory of the newly installed package
cd /home/gsods/di-mdm/<new package>/utils10. Run the installation script
./install_new_version.shThe installation script does the following:
-
Stops the running service of the DI component (
di-manager,di-mdm) -
Changes the symbolic link
latest-<di component>to the active package directory -
Starts the DI component service
11. As gsods OS user , upload the updated di-processor jar file to the flink
12. Remove the already uploaded di-processor jar file from the flink UI
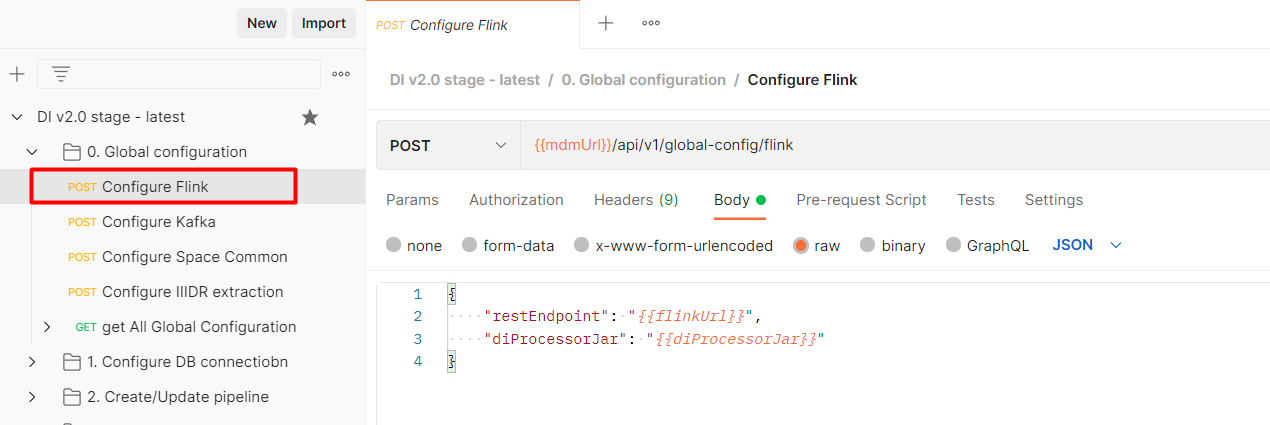
13. Verify in Postman that environment variable points to the latest Metadata Manager processor jar:

14. Via postman run Configure Flink API:
15. Via postman start a pipeline:
Working with Postman
The Postman standalone application can be found very useful in organizing the various DI layer Rest APIs![]() REpresentational State Transfer. Application Programming Interface
An API, or application programming interface, is a set of rules that define how applications or devices can connect to and communicate with each other. A REST API is an API that conforms to the design principles of the REST, or representational state transfer architectural style. in a correct logical order.
REpresentational State Transfer. Application Programming Interface
An API, or application programming interface, is a set of rules that define how applications or devices can connect to and communicate with each other. A REST API is an API that conforms to the design principles of the REST, or representational state transfer architectural style. in a correct logical order.
Create environment variables
As a first step let's define environment with all required environment variables.
-
Open Postman.
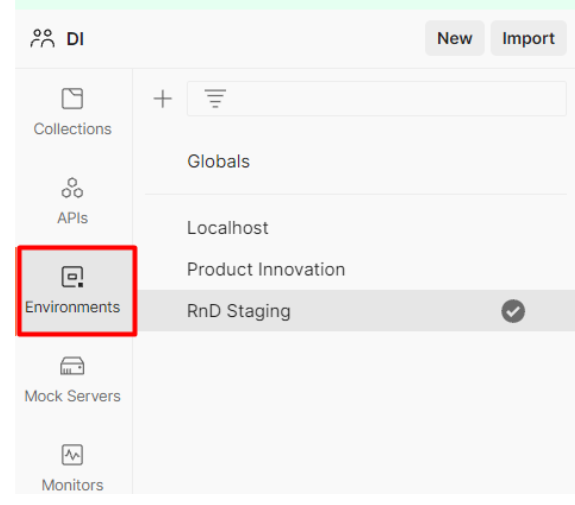
-
Go to the Environments tab:
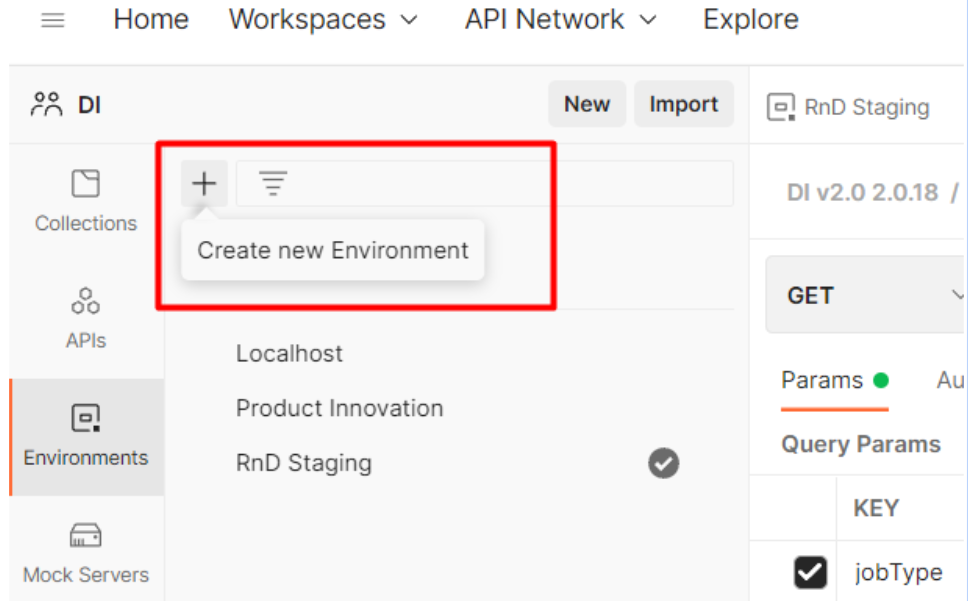
-
Create a new variables environment:
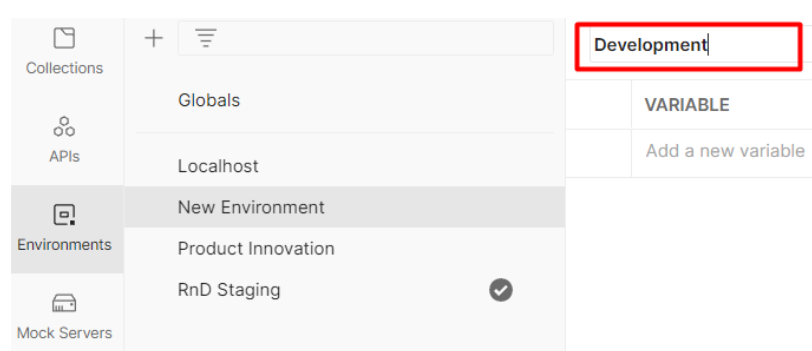
-
Provide a name for this new environment , for example “Development”:
-
Define the environment variables listed in the table below.
-
Save the newly created environment variables.

|
Variable name |
Example |
Description |
|
managerUrl |
http://di-stage-s1:6080 |
The http URL endpoint of the DI Manager including the port |
|
mdmUrl |
http://di-stage-s1:6081 |
The http URL endpoint of the MDM including the port |
|
flinkUrl |
http://di-stage-kafka1:8081 |
The http URL endpoint of the Flink including port |
|
bootstrapServers |
di-stage-kafka1:9092, di-stage-kafka2:9092, di-stage-kafka3:9092 |
Kafka bootstrap servers including ports. Multiple Kafka servers can be included in a comma separated format |
|
spaceLookupLocators |
di-stage-gs1 |
Space server |
|
spaceLookupGroups |
xap-16.2.0 |
|
|
spaceName |
DEV |
Space name |
|
kafkaGroupId |
diprocessor |
Kafka DI Consumer group name |
|
pipeline_cdc |
The name of the Kafka topic for CDC changes |
|
|
kafkaTopic_IL |
pipeline_il |
The name of the Kafka topic for initial load changes |
|
diProcessorJar |
/home/gsods/di-manager/latest-di-manager/lib/job-0.0.7.jar |
The full path of the DI Processor jar |
|
pipelineId |
The ID of the pipeline. This is generated upon pipeline creation and can be retrieved later on via list pipelines REST API GET {{managerUrl}}/api/v1/pipeline/ |
|
|
dbUrl |
JDBC jdbc:db2://<IP>:<db port>/<DB location> |
|
|
dbUsername |
DI database user name to connect to the source database |
|
|
dbName |
The name of the source database inside DI internal repository (this can be any name that logically represents the System of Records) |
|
|
dbSchemaName |
The source database schema that owns tables that DI captures changes from |
Import Collection of APIs
Postman API collection is a group of APIs organized in a logical order that represents certain product functionality , such as create pipeline, define generic environment, or administer pipeline.
DI Postman collection is released with every DI release and can be imported into the local postman environment.
In order to import released DI collection, proceed as follows.:
-
Open Postman
-
Go to the Collections tab and click Import:

-
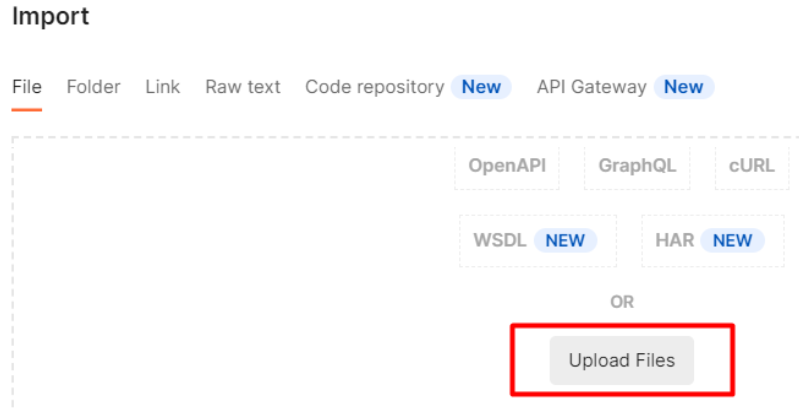
In a file tab click on “Upload files” and choose the newly downloaded DI Postman collection file to import from:
-
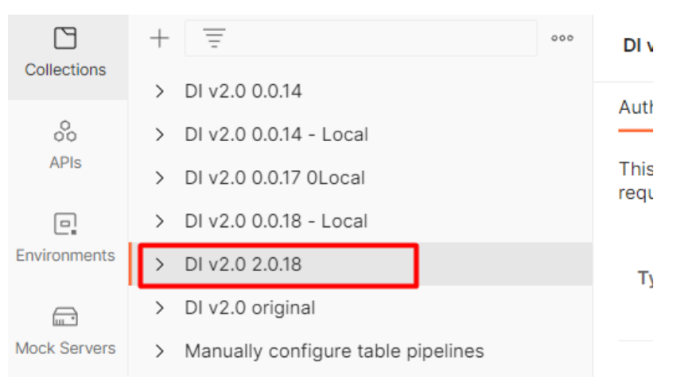
At the end of the import you should see a new collection present under the “Collections” tab.
Display the Status of the Data Integration Servers
After connecting to the Pivot server, go to the gs-odsx directory and run the ODSX script, logged in as root:
cd gs-odsx
./odsx.py
The ODSX Menu
The ODSX script presents a structured menu of options and operations, as shown below.
View Server Information
The [2] Servers option displays the Servers menu, which allows you to install and manage the servers in the system.
The sub menu allows you to specify actions for a specific server.
Choose [3] DI, and the following menu appears:
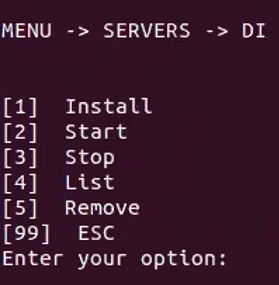
Option [4] list shows the available DI servers and their status. An example display is shown below.

APPENDIX – DI v2.0 Layer - Ports
|
# |
DI Component |
Protocol : Port |
Accessed by |
Remarks |
|
1 |
TCP:11801 |
IIDR Windows UI |
|
|
|
2 |
IIDR Kafka Agent |
TCP:11701 |
IIDR Windows UI |
|
|
3 |
IIDR Access Server |
TCP:10101 |
IIDR Windows UI |
|
|
4 |
Flink server |
HTTP:8081 |
Windows UI DI Manager |
|
|
5 |
Kafka |
TCP:9092 |
Flink server IIDR Kafka Agent |
Flink and Kafka are running on the same server |
|
6 |
TCP:2181 |
Metadata Manager |
|
|
|
7 |
DB2 ZOS |
TCP:<DB port> |
IIDR DB2ZOS Agent Metadata Manager DI Manager |
|
|
8 |
ZOS |
TCP:22 |
IIDR DB2ZOS Agent |
|
|
9 |
DI Manager |
HTTP:6080 |
GS UI (Windows) |
|
|
10 |
Metadata Manager |
HTTP:6081 |
GS UI(Windows) DI Manager Flink Server (DI Processor) |
Metadata Manager and DI Manager are running on the same server |
Need assistance or further information? Don't hesitate to contact us — we're here to help!