DIHCTL
Overview
The DIHCTL command line application is intended to perform different actions on the working Smart DIH![]() Smart DIH allows enterprises to develop and deploy digital services in an agile manner, without disturbing core business applications. This is achieved by creating an event-driven, highly performing, efficient and available replica of the data from multiple systems and applications, installation (environment). It can be run manually, or as part of a CI/CD pipeline.
Smart DIH allows enterprises to develop and deploy digital services in an agile manner, without disturbing core business applications. This is achieved by creating an event-driven, highly performing, efficient and available replica of the data from multiple systems and applications, installation (environment). It can be run manually, or as part of a CI/CD pipeline.
DIHCTL can connect to multiple Smart DIH![]() Digital Integration Hub.
An application architecture that decouples digital applications from the systems of record, and aggregates operational data into a low-latency data fabric. environments, and can be used to clone Smart DIH configurations from one environment to another. dihctl operates by sending REST
Digital Integration Hub.
An application architecture that decouples digital applications from the systems of record, and aggregates operational data into a low-latency data fabric. environments, and can be used to clone Smart DIH configurations from one environment to another. dihctl operates by sending REST![]() REpresentational State Transfer. Application Programming Interface
An API, or application programming interface, is a set of rules that define how applications or devices can connect to and communicate with each other. A REST API is an API that conforms to the design principles of the REST, or representational state transfer architectural style./GraphQL requests to the dih-admin service, which is part of the Smart DIH installation. For that purpose, dih-admin is added to the ingress of the Kubernetes
REpresentational State Transfer. Application Programming Interface
An API, or application programming interface, is a set of rules that define how applications or devices can connect to and communicate with each other. A REST API is an API that conforms to the design principles of the REST, or representational state transfer architectural style./GraphQL requests to the dih-admin service, which is part of the Smart DIH installation. For that purpose, dih-admin is added to the ingress of the Kubernetes![]() An open-source container orchestration system for automating software deployment, scaling, and management of containerized applications. cluster.
An open-source container orchestration system for automating software deployment, scaling, and management of containerized applications. cluster.
To authenticate DIHCTL use dedicated User Access Token configuration screen.
In order to authenticate DIHCTL, a dedicated User Access Token must be configured.
DIHCTL Installation
-
Download the DIHCTL installer for your operating system:
Operating system
Arch
Download link
macOS
arm64
Linux
x86_64
-
Open a terminal in the download location and run the following command:
tar -xzvf dihctl-1.0.0-Darwin-arm64.tgz -C ~
cd ~
sudo xattr -r -d com.apple.quarantine dihctl/
dihctl/dihctl version
Creating a User Access Token for DIHCTL
A user access token is needed to authenticate DIHCTL.
To create a user access token:
-
In SpaceDeck
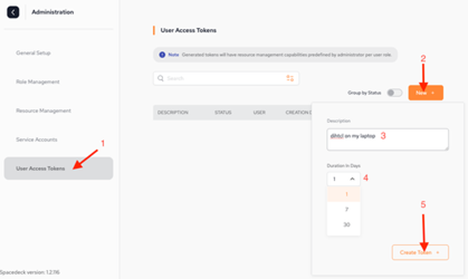
 GigaSpaces intuitive, streamlined user interface to set up, manage and control their environment. Using SpaceDeck, users can define the tools to bring legacy System of Record (SoR) databases into the in-memory data grid that is the core of the GigaSpaces system., click Settings and go to User Access Tokens.
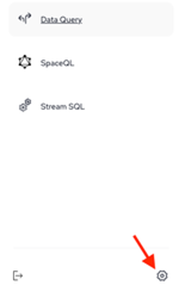
-
Click New.
-
Enter a Description.
-
Select the Duration in Days.
-
Click Create Token.
-
After the new token is created, a popup window appears, showing the access key and the command required for DIHCTL to login.
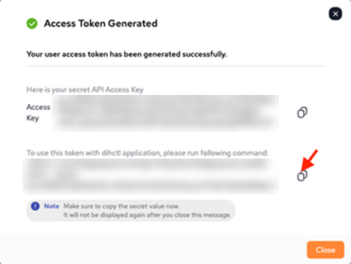
You have only one chance to copy the access key and command. Copy the command and execute it from the DIHCTL installation folder (i.e. ~/dihctl):
ch ~/dihctl
./dihctl -e team9.gigaspaces.net login http://team9.gigaspaces.net/dih-admin --bearer TOKEN
The -e parameter specifies the alias name for the Smart DIH environment.
SpaceDeck generates environment names by the ingress hostname. You can modify these environment names, for example: staging, production, dev.
Show Entities
You can use DIHCTL to show entities in a Smart DIH environment. For example, to show entities in an environment with the alias name staging:
./dihctl help show
./dihctl -e staging show pipelines
./dihctl -e staging show pipelines --help
./dihctl -e staging show services -f csv
./dihctl -e staging show spaces
./dihctl -e staging show datasources
Export Existing Configurations
Description:
To export definitions of existing pipelines, services, spaces, or relations in a certain environment into a specified output file in yaml format.
Command:
dihctl -e <environment_name> export <entity_name> <name1 name2 ...> -o <output.yaml>
Parameters:
| Parameter Name | Description |
Required |
|---|---|---|
| environment_name |
The environment to where the configuration will be exported. |
Yes |
| entity_name |
Which entity to export: pipelines, services, spaces, relations. |
Yes |
| name1, name2,... |
A list of entities to export, for example: myPipelineName1 myPipelineName2 If this is not provided, all existing entities will be exported. |
No |
| output.yaml |
The full path of the output file. |
Yes |
Examples:
-
Export pipelines myPipelineName1 myPipelineName2 from myEnv1 environment:
dihctl -e myEnv1 export pipelines myPipelineName1 myPipelineName2 -o /home/user/pipelines.yaml
Example of output pipelines.yaml:
pipelines: - name: "myPipelineName1" datasource: "ORA1" spaceName: "demo" tablePipelines: - schema: "RETAIL_DEMO" name: "PRODUCTS" spaceTypeName: "PRODUCTS3" spaceId: [] routingKey: "PRODUCT_ID" indexes: [] tieredStorageConfig: rule: "DEFAULT" transformations: [] - name: "myPipelineName2" datasource: "ORA1" spaceName: "demo1" advanced: checkpointInterval: 2000 batchWrite: 10 tablePipelines: - schema: "RETAIL_DEMO" name: "CUSTOMERS" spaceTypeName: "CUSTOMERS3" spaceId: [] routingKey: "CUSTOMER_ID" indexes: [] tieredStorageConfig: rule: "DEFAULT" transformations: [] -
Export all relations from myEnv1 environment:
dihctl -e myEnv1 export relations -o /home/user/relations.yaml
Apply New Configurations (Import)
Description:
To apply a new configuration to the certain environment from the specified yaml file. Apply will attempt to create specified entities based on a conflict resolution mechanism and start/deploy them.
Command:
dihctl -e <environment_name> apply -s -f <input.yaml> --force --continue-on-errors
Parameters:
| Parameter Name | Description |
Required |
|---|---|---|
| environment_name |
The environment to which the configuration will be applied. |
Yes |
| -fis |
The full path of the input file containing the configuration definition in yaml format. It can contain any mix of configuration entities: pipelines, services, spaces, relations. |
Yes |
| -s |
For applying pipelines only. Whether to start the pipelines after the import. |
No |
|
--force |
For applying pipelines only. Whether to try and override existing pipelines, if possible. |
No |
|
--continue-on-errors |
For applying pipelines only. Whether to continue execution even if an error occurs in any of the table pipelines. |
No |
Examples:
-
Force apply pipelines myPipelineName1 myPipelineName2 to myEnv1 environment and start them:
dihctl -e myEnv1 apply -s -f /home/user/input.yaml --force --continue-on-errors
Apply pipelines myPipelineName1 myPipelineName2 to myEnv1 environment, but do not start them:
dihctl -e myEnv1 apply -f /home/user/input.yaml
Example input.yaml:
pipelines: - name: "myPipelineName1" datasource: "ORA1" spaceName: "demo" tablePipelines: - schema: "RETAIL_DEMO" name: "PRODUCTS" spaceTypeName: "PRODUCTS3" spaceId: [] routingKey: "PRODUCT_ID" indexes: [] tieredStorageConfig: rule: "DEFAULT" transformations: [] - name: "myPipelineName2" datasource: "ORA1" spaceName: "demo1" advanced: checkpointInterval: 2000 batchWrite: 10 tablePipelines: - schema: "RETAIL_DEMO" name: "CUSTOMERS" spaceTypeName: "CUSTOMERS3" spaceId: [] routingKey: "CUSTOMER_ID" indexes: [] tieredStorageConfig: rule: "DEFAULT" transformations: [] -
Apply and deploy service myService1 to myEnv1 environment:
dihctl -e myEnv1 apply -f /home/user/input.yaml
Example input.yaml:
services:
- serviceName: "myService1"
  spaceName: "demo"
  sqlTemplate: "select * from CUSTOMERS"
  description: ""
  replicas: 1
Delete Entities
Description:
To delete specific pipelines or services in a specific environment.
Command:
dihctl -e <environment_name> delete <entity_name> <name1 name2 ...> --delete-subscription
Parameters:
| Parameter Name | Description |
Required |
|---|---|---|
| environment_name |
The environment from which the configuration will be deleted. |
Yes |
| entity_name |
Which entity to delete, pipelines or services. |
Yes |
| name1, name2,... |
A list of entities to delete, for example: myPipelineName1 myPipelineName2 |
Yes |
| --delete-subscription |
For deleting pipelines only. Whether or not to delete the pipeline subscription. The default value is 'yes'. |
No |
Examples:
-
Delete pipelines myPipelineName1 myPipelineName2 from myEnv1 environment:
dihctl -e myEnv1 delete pipelines myPipelineName1 myPipelineName2
-
Delete service myService1 from myEnv1 environment:
dihctl -e myEnv1 delete services myService1