HelloWorld example
If you are new to the Hello World example, we suggest to first review the Hello World screen cast . With this page we provide a short overview of the example, and get you started with applying security aspects to it.
The example distribution can be found under <XAP root>/examples/helloworld.
Overview
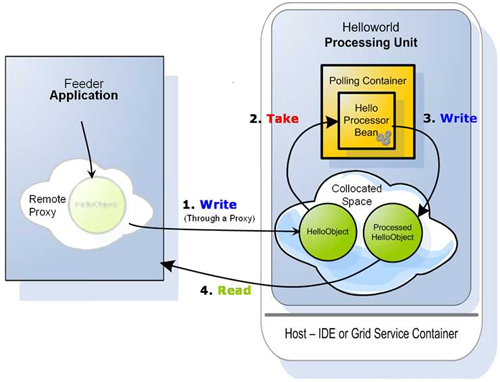
We have a processor bean that will process HelloObjects - it works with a polling container to talk to with a Space, all inside of a Helloworld Processing Unit. External to that process is the Feeder application, which gets a remote proxy to the Space and uses it to write objects (#1). The HelloObject written to the Space becomes interesting to the polling container. The polling container will take it out of the Space (#2), hand it to the HelloWorld processor bean for processing, and then write the results back to the Space (#3). In this case a ProcessedHelloObject. Later, our feeder application can read the results (#4) and print them out to the screen.
What needs to be secured?
Obviously we want to protect the Space data (containing both HelloObject and ProcessedHelloObject). We need to first define the Space as secured. The processor beans’ polling container needs to be granted Take access for HelloObject and Write access for ProcessedHelloObject. Secondly, the Feeder which gains a remote proxy to the Space, needs to be granted Write access for HelloObject and Read access for ProcessedHelloObject.
Securing the Space
Lets define a secured space in hello-processor/META-INF/spring/pu.xml by adding the secured namespace property. This can also be accomplished by adding the secured Space URL property.
<!-- pu.xml -->
<os-core:embedded-space id="space" space-name="processorSpace">
   <os-core:security secured="true"/>
</os-core:embedded-space>
Granting access to the embedded polling container
Accessing the secured space requires a principal. In this case the principal is the processor beans’ polling container.
Lets assume the principals’ credentials are: username=“helloProcessor” and password=“helloWorld”.
There are two options for providing the principal credentials. The first, is by adding the credentials in pu.xml. The drawback is that the credentials are exposed. The second, which is preferred, is during deployment of the processing unit.
<os-core:embedded-space id="space" space-name="processorSpace?secured">
    <os-core:security username="helloProcessor" password="helloWorld"/>
</os-core:embedded-space>
Granting access to the Feeder
The Feeder in this example is not a processing unit. It is just an external process acquiring a remote proxy to the Space.
Lets take a look at the Feeder constructor.
public Feeder(String url){
  IJSpace space = new UrlSpaceConfigurer(url).space();
  this.gigaSpace = new GigaSpaceConfigurer(space).gigaSpace();
}
The feeder needs to be granted access for operations it will perform on the remote secured Space. In this case the feeder is the principal. Lets assume the principals’ credentials are: username=“helloFeeder” and password=“feedTheWorld”.
public Feeder(String url){
  IJSpace space = new UrlSpaceConfigurer(url).userDetails("helloFeeder", "feedTheWorld").space();
  this.gigaSpace = new GigaSpaceConfigurer(space).gigaSpace();
}
Protecting User/Password
With production environment the user/password used by the application (for database or space access) should be passed into the application at the deploy time. This will make sure the user/password will never be stored on file and be accessible.
<os-core:embedded-space id="space" space-name="processorSpace">
</os-core:embedded-space>

Using the CLI deploy command supply username and password using the -user and -password.
> gs deploy -secured -user testing -password 1234 myPU.jar
Another option, is to set the security username/password as variables at the pu.xml and inject them - for example, via a deploy property:
<os-core:embedded-space id="space" space-name="processorSpace">
    <os-core:security username="${myusername}" password="${mypassword}"/>
</os-core:embedded-space>

Using the CLI deploy command embed the username and password matching the placeholders given in the pu.xml

> gs deploy -properties embed://myusername=testing;mypassword=1234 myPU.jar
Declaring the principals
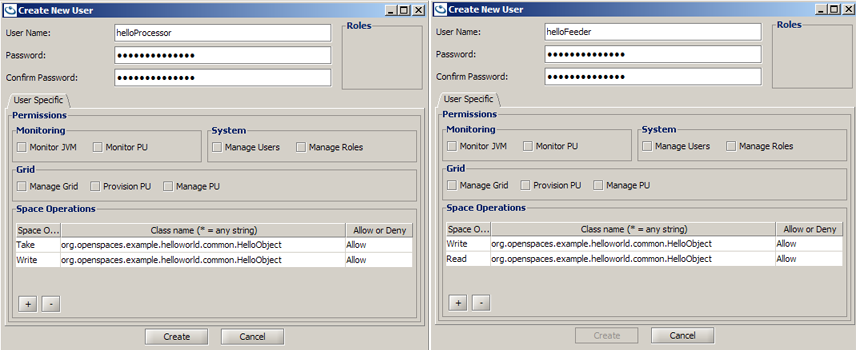
Managing the users and their authorities can either be done using the UI or API.
We have two users to declare - “helloProcessor” and the other “helloFeeder”.
The “helloProcessor” user will be granted Take access for HelloObject and Write access for ProcessedHelloObject.
The “helloFeeder” user will be granted Write access for HelloObject and Read access for ProcessedHelloObject
- The
ProcessedHelloObjectis fictive. Actually theFeederwaits forHelloObjecttemplate matching the “Hello World !!” String. - The
HelloObjectwas replaced by aMessageObject in the products example. Thus the actual class that should be granted privileges for isorg.openspaces.example.helloworld.common.Message.
Lets look at how easily it can be using the GigaSpaces Management Center (UI) Security
Running the Example
There are a couple of deployment options. For example deploying using the ant build script or the UI.
To simplify this example we will assume that the Service Grid components are not secured.
- Start a GSM
- Start a GSC
- Run the build
deploy-processortarget - Run the build
run-feedertarget
Secured Service Grid
To complete this example, we will give a brief overview of what needs to be done to deploy into a secured Service Grid.
In a secured Service Grid, the GSM and GSC are secured. This means that in order to deploy, you must have Provision PU privileges. Declare another principal with Provision PU, that will be used for deploying.
Using the UI, Login with this principals’ credentials, and open the deployment wizard to deploy the processor.
Now, all that is left is to run the feeder as an external application.