Tableau Integration
Overview
Organizations often require quick insight into data to understand the business impact, and don't want to waste
valuable time consulting their corporate IT team. With the InsightEdge JDBC driver ,
this can be done using the data stored in the data grid. Tableau
can be connected to the data grid via
This topic describes how to set up an integration of Tableau with GigaSpaces in a Microsoft Windows environment, so that the GigaSpaces JDBC driver can be used to retrieve data and display it in a graphic visual representation.
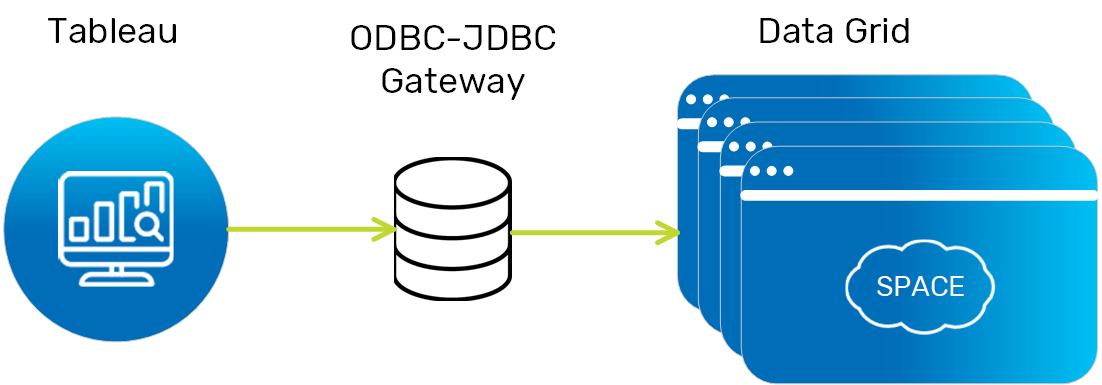
Architecture
Tableau can connect to the data grid using the GigaSpaces JDBC driver. However, Tableau can only use ODBC as a general connection option, so a third-party ODBC-JDBC connection is needed to convert ODBC requests from Tableau into JDBC requests for the GigaSpaces JDBC driver. The Easysoft ODBC-JDBC gateway has been evaluated and certified for use with GigaSpaces, and is used in the integration described here.
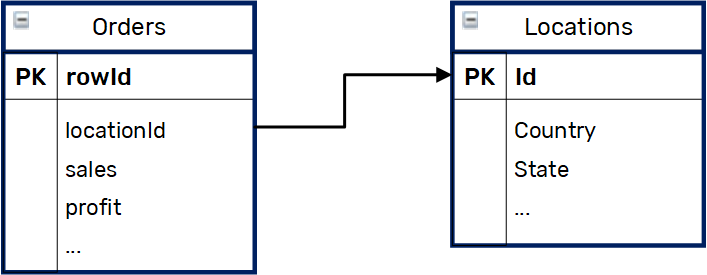
Sample Data Set
The example in this topic uses a familiar Simple - Superstore Tableau users data set. The original schema
is too simple to show the join capabilities, so the model was updated with location information that is referenced
by the orders entity. The updated schema is as follows:
Integrating Tableau with GigaSpaces
In order to integrate Tableau with GigaSpaces, you need a data grid that is up and running, and you need access to it. After setting up and starting GigaSpaces, do the following to create the necessary environment to integrate Tableau and view data:
-
Add sample data to the Space.
-
After GigaSpaces has been configured, download and install the ODBC-JDBC gateway, activate it with a trial license, and set it up in Microsoft Windows.
-
Download and configure Tableau to work with GigaSpaces
-
Perform a query on the data grid via Tableau, and view the results.
Configuring GigaSpaces Locally
Before you deploy the data grid for the purpose of this demo, you should install the GigaSpaces dependencies.
Deploying the Data Grid
The first step is deploying a data grid and creating a Space.
To deploy the data grid on a local machine:
- From the
$GS_HOME\tools\mavendirectory, run theinstallmavenrep.batscript. - From the
$GS_HOME\insightedge\tools\mavendirectory, run theinsightedge-maven.cmdscript. -
Navigate to the
$GS_HOME\bindirectory and launch a command window. -
Type
insightedge host run-agent --auto --gsc=2to create a data grid. -
Launch a new command window.
-
Type
insightedge space deploy --partitions=2 tableauSpaceto create a Space with the nametableauSpace.
Populating the Space
After the Space is created, it needs to be populated with sample data, so that you can later run queries on this data via Tableau.
To populate the Space with data:
-
Download the InsightEdge SQL demo and unpack it.
-
Under the extracted insightedge-sql-demo folder, build the sample with
mvn clean install. -
Execute the following command:
java -jar target\insightedge-sql-demo.jar --space-url "jini://*/*/tableauSpace?locators=127.0.0.1" --lookup-group <DATA_GRID_LOOKUP_GROUP> -
Substitute the value
<DATA_GRID_LOOKUP_GROUP>with the appropriate value for your deployment. The lookup-group argument is optional. -
Open the GigaSpaces Management Center in order to verify that the data was populated in the Space as expected.

Adding the GigaSpaces JDBC Client JAR to the Classpath
When connecting to the data grid, the ODBC-JDBC gateway runs the GigaSpaces JDBC driver. In order to make the driver visible to the ODBC-JDBC gateway, you have to create a special JAR file for use when configuring the gateway in Microsoft Windows.
To generate the GigaSpaces JDBC Client JAR:
-
Navigate to
$GS_HOME\insightedge\tools\jdbc. -
Run the
build-jdbc-client.cmdscript to create the fileinsightedge-jdbc-client.jar.
Setting Up the ODBC-JDBC Connection
Follow these instructions to download, install, and set up the Easysoft ODBC-JDBC gateway.
If you don't want to use the Easysoft ODBC-JDBC Gateway, you can use your preferred bridge implementation.
Installing the Easysoft ODBC-JDBC Gateway
To download and install the Easysoft ODBC-JDBC gateway:
-
Log in to the Easysoft web site: link. (If this is your first time working with Easysoft, first follow the instructions to register and create your Easysoft user account.)
-
Download the gateway from the Easysoft website.
-
Install the gateway on your local machine.
Requesting an EasySoft License
After you install the Easysoft gateway on your machine, you must request a trial license in order to run the application.
To obtain a trial Easysoft license for the ODBC-JDBC gateway:
- Navigate to
<EASYSOFT-HOME>\Easysoft\License Managerand open the Easysoft Data Access License Manager. -
Complete the following:
-
Provide your Easysoft account information:
Name,E-Mail Address,Company,Telephone -
Click Request License.
-
Select the license type (Trial).
-
Click Next.
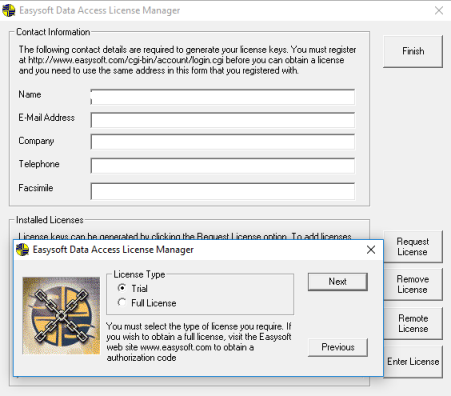
-
-
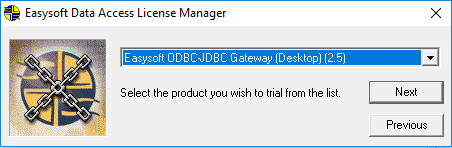
From the dropdown list, select Easysoft ODBC-JDBC Gateway (Desktop)(2.5), then click Next.
-
Review your contact information to verify that it is correct, and click On-line Request.
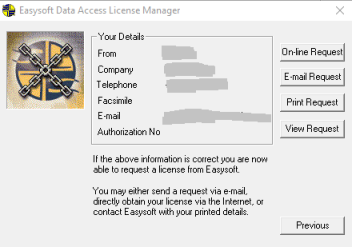
Look in your email spam section for the license. At this point, your user account is updated and you have access to the ODBC-JDBC gateway software for the duration of the trial license period.
Configuring the ODBC-JDBC Gateway
After you have installed the gateway software and obtained a trial license, you have to configure the gateway to point to the required data source.
To configure the ODBC-JDBC gateway:
-
Navigate to the ODBC Data Source Administrator in Microsoft Windows.
For instructions on how to access the ODBC Data Source Administrator, see this Microsoft help topic.
-
On the right-hand side of the ODBC Data Source Administrator window, go the System Data Sources tab, click Add.
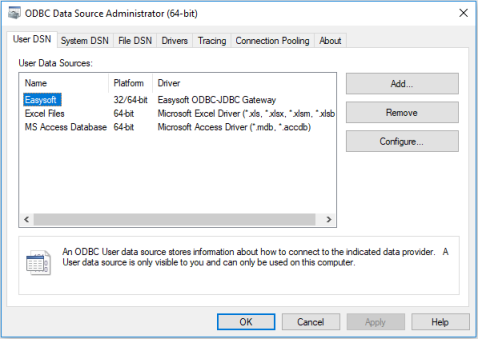
-
In the Create New Data Source dialog that opens, click Easysoft ODBC-JDBC Gateway.
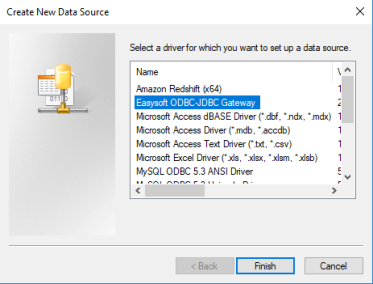
-
Click Finish.
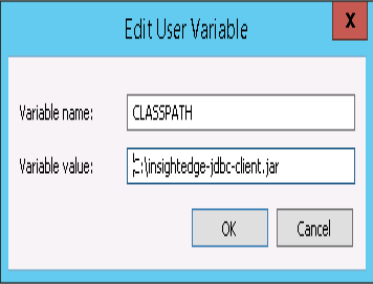
-
IMPORTANT - edit the CLASSPATH environment variable and append to it the path to your insightedge-jdbc-client.jar file. Create the CLASSPATH environment variable if it doesn't exist.
-
In the Easysoft ODBC-JDBC Gateway DSN Setup window that is displayed, configure the gateway access to the data source by filling in the fields with the following values:
-
DSN: easysoft-insightedge-odbc-jdbc
-
Driver Class: com.gigaspaces.jdbc.Driver
-
Class Path: Leave field empty
-
URL: jdbc:insightedge:url=jini://*/*/tableauSpace?locators=127.0.0.1
-
-
Check the Strip Quote check box.
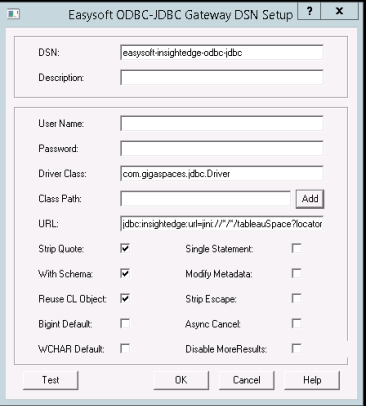
-
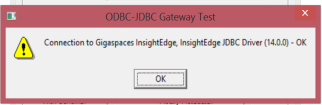
Click Test to verify the new connection.
-
Click OK in the confirmation message, and click OK in the Easysoft ODBC-JDBC Gateway DSN Setup window to save your changes.
-
Click OK in the ODBC Data Source Administrator window.
Setting Up Tableau
Download and install the Tableau desktop.
After the data grid has been populated with the sample data, and
Configuring the Data Source
Tableau has to be configured to use the ODBC-JDBC gateway as the data source.
To configure the
- Start Tableau.
-
Click Connect in the Tableau desktop, and select
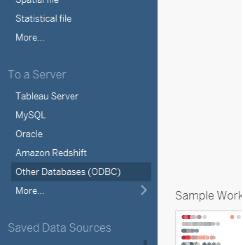
-
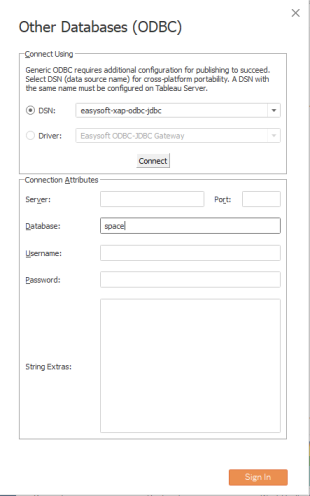
In the Other Databases (ODBC) window, configure the options as follows:
a. In the Connect Using area, defin the DSN:
-
Select easysoft-insightedge-odbc-jdbc.
-
Click Connect.
b. In the *Connection Attributes** area, provide the name of the database:
- In the Database field, type space.
-
-
Click Sign In.
-
Under Connections, click the search icon in the Schema area and select space.
The sample data contains a Space called space. If you have additional Spaces in your GigaSpaces environment, they may appear in this list.
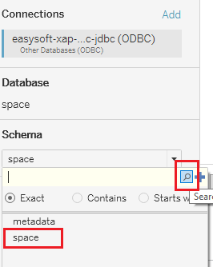
-
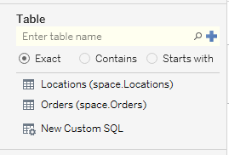
Verify that Tableau can see the sample data by peforming a table search. You should see Locations and Orders in the list of tables.
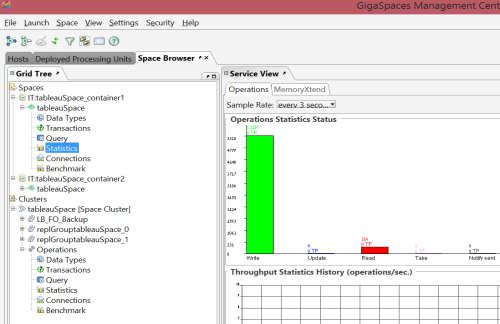
Querying the Data Grid
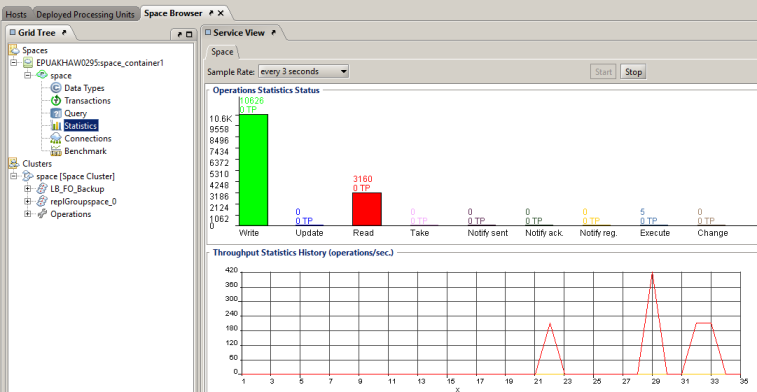
Before performing a query on the data grid, you can use the GigaSpaces Management Center to look at the Space that contains the sample data. At this point, there have been no read operations.
Everything that needs to be configured has been set up, and you can execute queries against the data in the grid.
To query the data in GigaSpaces:
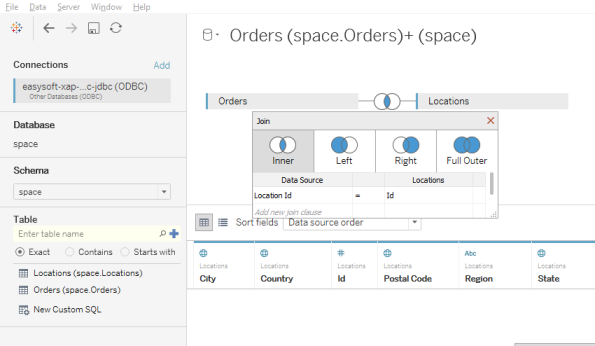
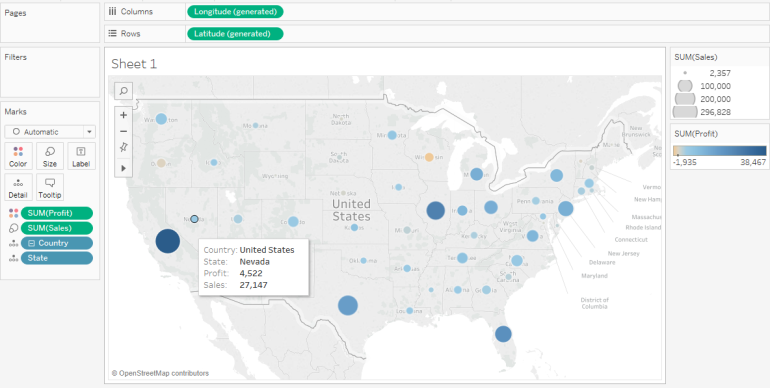
- From the Data tab, drag and drop the Orders and Locations tables to the data pane.
-
Join the tables as Inner.
-
Below the data pane, select the Sheet1 tab.
-
Select Country and State from the Locations node using standard Windows functionality (press the Ctrl key while selecting).
-
Right-click and select Create Hierarchy from the menu that is displayed.

-
Double-click State.
-
From the Measures area, drag and drop Sales to the Size option in the Marks card, and Profit to the Color option.
-
View the results in the data pane; you can easily see the sales-profit insight that was derived from the data retrieved from the data grid.
-
In the GigaSpaces Management Center, view the Space operations statistics. You can see the read operations that were performed when Tableau accessed the data grid to construct the view:
Additional Resources
|
|
|
Predictive Stock Pricing Demo |

