SpaceDeck - SSO IDP Setup
For configuring SSO (Secure Sign-On) for SpaceDeck, GigaSpaces supports using any IDP that supports OpenID Connect (OIDC) including Okta, Azure Active Directory, Amazon Cognito and Keycloak. We provide examples below of how to configure this using Okta
For user management through the IDP, roles and groups are created and then certain roles can be assigned to the user, for example admin. Via Spacedeck roles are then created with the same name which was created in the IDP and permissions are then assigned accordingly for each role.
-
Create a developer account in Okta
-
Once created, log in to the account and from the left side menu, select Applications:
-
Click Create App Integration:
-
From the pop-out menu, select Sign-in method OIDC - OpenID Connect and Application type Web Application. Then click Next:
-
In the New Web App Integration screen:
-
Provide an App integration name. In the example below it is Test Demo App.
-
From Grant type select Authorization Code from the Client acting on behalf of a user section.
If you want to use the refresh token mechanism, Refresh Token should also be selected.
-
From Sign-in redirect URIs set up a redirect URI -> URI to security service callback.
-
-
Controlled access is customizable according to each client's requirements. GigaSpaces has tested it with the following setting:
-
Click Save. Okta will provide a Client ID and Client Secret.
-
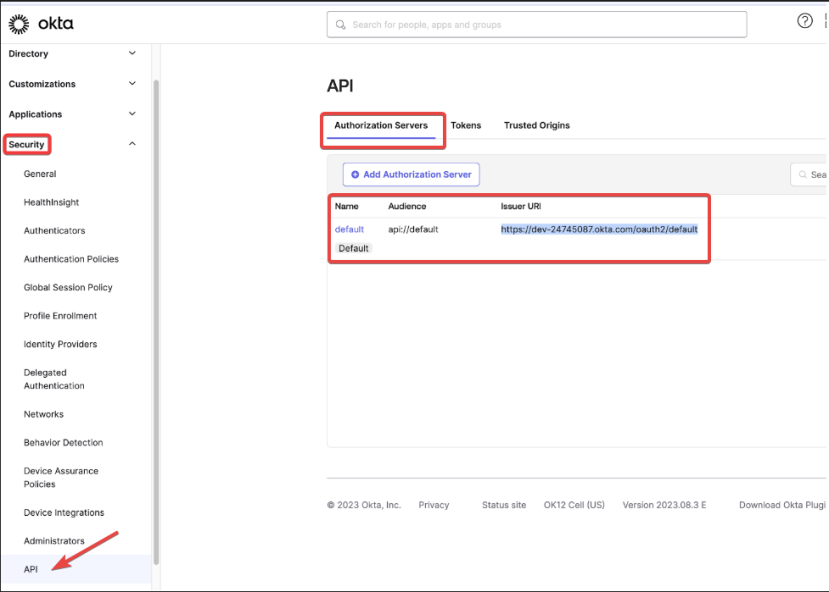
On the left side menu, select Security then API where you will find the Issuer URI that should be provided to SpaceDeck when you are setting up the IDP. Here the client has the option to customize and create a new authorization server. In this specific example, it was tested using the default:
-
In the SpaceDeck, the Client ID, Client Secret and Issuer URI are populated as followed:

-
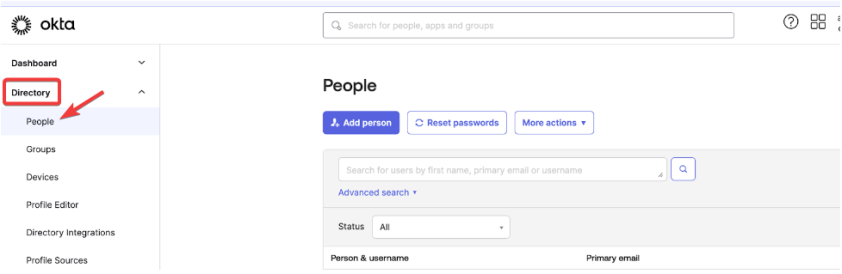
To manager users in Okta, on the left side menu, select Directory then People:
-
To manage groups in Okta (which are translated as roles in SpaceDeck), on the left side menu go to Directory then Groups. By default in Smart DIH the role of ROLE_ADMIN has all privileges. It is customizable and can be changed via the config map. However, to follow the default behavior and to use the ROLE_ADMIN in SMART DIH, a ROLE_ADMIN group has to be created in OKTA and people assigned to this group. This group will contain administrators and will have all privileges. To create a group in Okta, on the left side menu, go to Directory then Groups and click Add group, supply the name ROLE_ADMIN and then click Save.

-
From the drop-down of Group source type, select Okta groups. The ROLE_ADMIN group will be in the list.

-
To assign users to ROLE_ADMIN (or any other created group) on the left side menu, go to Directory then People and choose users from the list of users. Click the user. To switch the users groups, type the group name and then click enter.

-
Now the access token claims have to be customized so it will have groups used in Smart DIH. To accomplish this, on the left side menu go to Security then API and on the API screen, Authorization Servers:

-
Select the server that is being used and go to the Claims tabs then Access:

-
Click Add Claim and input a name for the Claim. In the Value type drop-down select Groups. For Filter, provide the filter to be applied. In this example, only groups with the ROLE_ prefix should be used. Click Create.
The name of the claim will be used in SpaceDeck in the IDP Setup, for the setting of Authorization Grant Type

In SpaceDeck:

-
In order to bind the IDP that has been created above, the root user has to login to SpaceDeck with the correct username/password and then populate all the Connection fields in the Administration/General Setup menu.
By default, the root user has root/password credentials. This must be changed before installation using the parameter of global.password seen in step 3 of the Instructions for Smart DIH Installation using Kubernetes.
-
Once the IDP has been configured, users can now use SSO login to sign in securely by selecting the Single sign-on option:

-
After clicking LOGIN, the user will be redirected to the Okta login form to provide credentials:


-
Login to your Azure developer account.
-
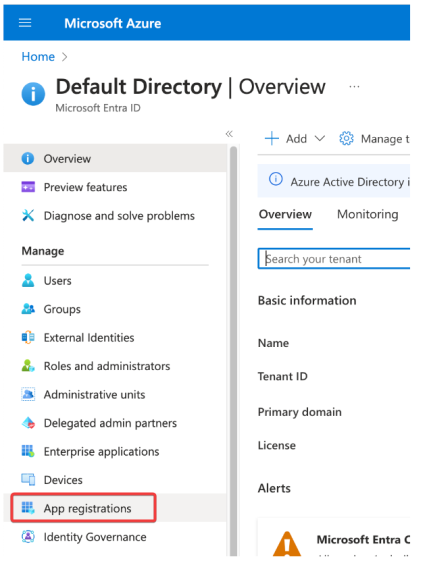
Select Microsoft Entra ID:

-
Select App registrations from the left-side menu:
-
Click + New registration from the middle top:

-
Input the following:
-
Your application name
-
Supported account types (can use the choice as per the screenshot below)
-
Redirect URI - Select Web from the drop-down menu and provide the redirect URI of your application
-
Click Register

-
-
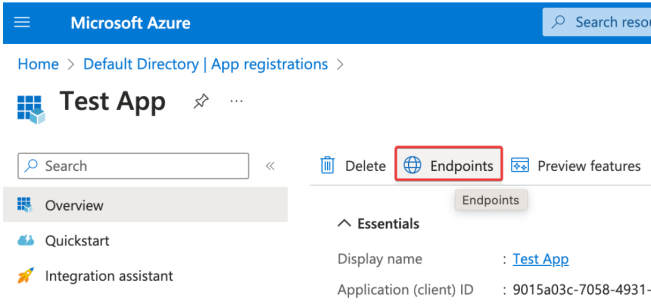
Select App registrations and select the App you have just registered. In the example below, this is named Test App:

-
Click Add a certificate or secret from the right-hand side in order to create a client secret:

-
Click + New client secret:

-
Provide a secret description and select an expiration time from the drop-down menu. Then click Add which is found at the bottom of the screen:

-
Once a client secret has been created, copy and save the Value of the secret:
It is important to copy and save the value as you will NOT be able to view it later

-
The Client secret value should be pasted into the Client Secret field in the SpaceDeck Administration/General Setup menu during IDP setup:

-
From the Azure application, copy the for Application (client) id:

-
The Application (client) ID value should be pasted into the Client Id field in the SpaceDeck Administration/General Setup menu during IDP setup:

-
From the Azure application, select Endpoints from the middle top menu:
-
From the Endpoints list, find and copy the link OpenID Connect metadata document that ends with /v2.0/.well-known/openid-configuration. Paste this link into a browser and copy the issuer value from the response. This value should then be pasted into the Issue URL field in the SpaceDeck Administration/General Setup menu during IDP setup:

-
Generate scope:
-
From the Azure application, select Expose an API
-
Click Add next to Application ID URI. You can use the default value. At the bottom of the screen, click Save.
-
Click +Add a scope

-
Provide a Scope name
-
For Who can consent? select Admins and users
-
Populate the mandatory fields with your description, then click Add scope at the bottom of the screen.

-
-
Copy the Scopes value:

-
This Scopes value should then be pasted into the scope field in the SpaceDeck Administration/General Setup menu during IDP setup:

-
To manage roles for your application (in this case SpaceDeck), go to the Azure application and select App roles and then click + Create app role:

-
Provide role details and then click Apply at the bottom of the screen. This is an example of a role creation for ROLE_ADMIN:

-
To manage users for your application (in this case SpaceDeck), navigate to the Microsoft Entra ID screen and from the left-side Manage menu, select Users:

-
To assign users and groups (roles) for your application (in this case SpaceDeck), navigate to Microsoft Entra ID screen and select Enterprise applications from the left-side menu:

-
Select your application and then on the next screen, click Assign Users and Groups:

-
Click Add user/group:

-
Select user and role and click Assign at the bottom of the screen:

-
In the SpaceDeck, in the Administration/Role Management menu enter roles for the Authorization Grant Type field:


