XAP.NET MongoDB Data Grid
| Author | XAP Version | Last Updated | Reference | Download |
|---|---|---|---|---|
| Shay Hassidim | 9.7 | April 2014 |
Overview
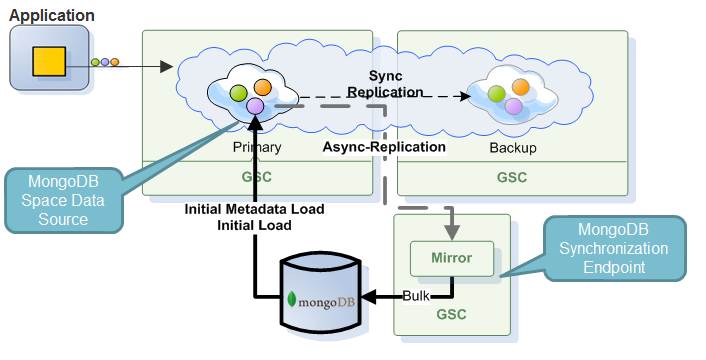
The MongoDB Data-Grid example demonstrates a common Data Grid / Caching architecture using MongoDB for persistence. It includes the following components.
- A Client application that perform write and read operations against a remote clustered IMDG.
- A Clustered IMDG with write-behind (Mirror service) with pre-fetch (initial load) enabled. The Data grid using MongoDB database.
This best practice will demonstrate show to implement this with XAP.NET.
Structure
The example contains two .Net projects:
GigaSpaces.Examples.Datagrid.Commons- Includes the entities project (Person) used in the example and other common functionalities.GigaSpaces.Examples.Datagrid.Client- A client application performs write and read operations against the data grid.
The example includes two additional Processing Unit folders:
- datagrid-mongo - Include a jar with the data grid configuration. See within the jar the
pu.xmlfor MongoDB URL.mongodb://localhost:27017/dbused by default. - mirror-mongo - Include a jar with the mirror configuration. See the within the jar the
pu.xmlfor MongoDB URL.mongodb://localhost:27017/dbused by default.
Prerequisites
- MongodbDB (win32-x86_64-2008plus-2.4.9) installed and running.
- Visual Studio 2010 with Service pack 1 or Visual Studio 2013
- XAP.NET 9.7 installed. Have the license key placed into
C:\GigaSpaces\XAP.NET 9.7.0 x64\Runtime\gslicense.xml.
Building the Example
Step 1:
Download the example and extract it into the <GigaSpaces XAP .Net Root>\Examples (i.e. C:\GigaSpaces\XAP.NET 9.7.0 x64\NET v4.0.30319\Examples) folder. A new folder called Datagrid-MongoDb will be created.
Step 2:
Browse to the Datagrid-MongoDb folder
Step 3:
Run the BuildAll.bat script to compile the example.
Running the Data Grid
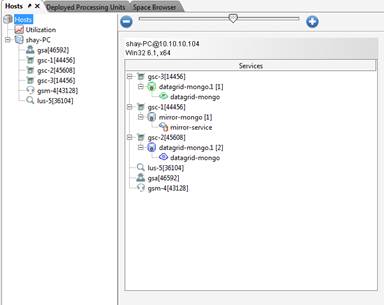
Step 1: Run Gigaspaces Agent by running the StartAgent.bat script. This will start 3 containers.
Step 2:
Deploy the data grid and the Mirror service by running DeployDataGrid.bat. You should see this after running the Gs-ui.exe:
Running the Client Application
The client application has several options:
runWrite.bat- will write 10Personobjects into the data grid and persist to MongoDB.runWriteMultiple.bat- will write 100Personobjects (10 batches of 10 Person objects) into the data grid and persist to MongoDB.runRead.bat- will read aPersonobject from the data grid.runReadMultiple.bat- will read a 100Personobject from the data grid.
Opening .NET Solution with Microsoft Visual Studio
- Double-click the
GigaSpaces.Examples.Datagrid.slnfile. - Choose
Build > Build Solutionmenu. The project files and dependencies are created and copied to thereleasedirectory.
Viewing the data within the Data Grid
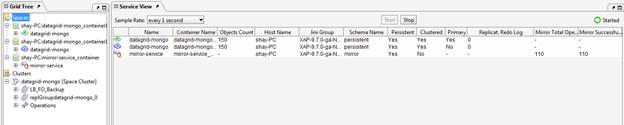
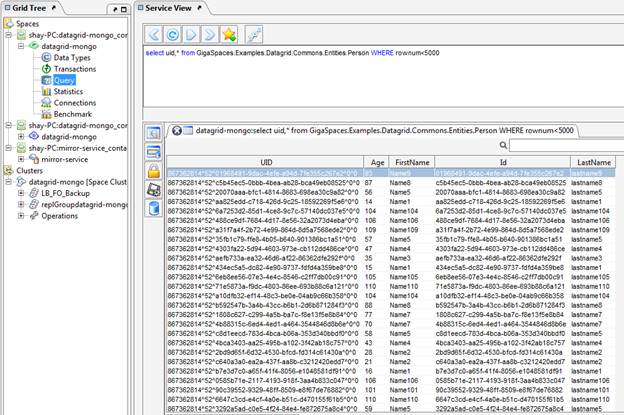
Run GigaSpaces UI: Go to <GigaSpaces Root>\Bin and run Gs-ui.exe. This will allow you to view the content of the data grid.

Viewing data Persist into MongoDB
\mongodb-win32-x86_64-1.8.2\bin>mongo.exe
> use db
switched to db db
> db.GigaSpaces.Examples.Datagrid.Commons.Entities.Person.count()
50
> db.GigaSpaces.Examples.Datagrid.Commons.Entities.Person.find()
{ "__type__" : "GigaSpaces.Examples.Datagrid.Commons.Entities.Person", "FirstName" : "Name101", "Age" : "101", "LastName" : "lastname101", "_id" : "33
94b1f1-39d1-4c04-8c73-6f41d42c13ad" }
{ "__type__" : "GigaSpaces.Examples.Datagrid.Commons.Entities.Person", "FirstName" : "Name102", "Age" : "102", "LastName" : "lastname102", "_id" : "d6
a18590-ffb3-4dad-9548-009004b86353" }¦
Setting MongoDB URL
To modify the MongoDB URL used with the example update the pu.xml within the Datagrid-mongo.jar and mirror-mongo.jar to have the right value instead the one used:
<constructor-arg value="mongodb://localhost:27017/db" type="java.lang.String" />
Running Data Grid in Cache Miss Mode
To run the Data Grid in Cache miss mode update the pu.xml within the Datagrid-mongo.jar to have:
<os-core:embedded-space id="space" name="datagrid-mongo" space-data-source="mongospaceDataSource" mirror="true" schema="persistent">
  <os-core:properties>
    <props>
        <!-- 0 for LRU , 1 for IN CACHE -->
        <prop key="space-config.engine.cache_policy">0</prop>

        <prop key="space-config.engine.initial_load">0</prop>
        <prop key="space-config.engine.cache_size">100000</prop>

        <prop key="space-config.engine.memory_usage.enabled">true</prop>
        <prop key="cluster-config.cache-loader.central-data-source">true</prop>
        <prop key="cluster-config.mirror-service.supports-partial-update">true</prop>
        <prop key="space-config.engine.memory_usage.high_watermark_percentage">90</prop>
        <prop key="space-config.engine.memory_usage.write_only_block_percentage">85</prop>
        <prop key="space-config.engine.memory_usage.write_only_check_percentage">76</prop>
        <prop key="space-config.engine.memory_usage.low_watermark_percentage">75</prop>
        <prop key="space-config.engine.memory_usage.eviction_batch_size">100</prop>
        <prop key="space-config.engine.memory_usage.retry_yield_time">2000</prop>
        <prop key="space-config.engine.memory_usage.retry_count">10</prop>
        <prop key="space-config.engine.memory_usage.explicit-gc">false</prop>
        <prop key="space-config.engine.memory_usage.gc-before-shortage">false</prop>

     </props>
  </os-core:properties>
</os-core:embedded-space>
The following controls how Cache miss works:
<prop key="space-config.engine.cache_size">10000</prop>
<prop key="space-config.engine.initial_load">0</prop>