Connect to a Data Source
This page explains how to easily connect to data sources and upload data to GigaSpaces. The work flow has three steps:
- Select either a database or data warehouse. Define various properties of the data source and the naming of the space and stateful service at GigaSpaces.
- Review the data structure within the selected data source and choose the required data to load.
- Choose between two options to deploy and run the system:
- Download the generated project files, customize as required and deploy
- Automatically deploy at your local machine.
GigaSpaces target properties
The IT administrator define the service and space names within the GigaSpaces Platform:
- Service name (default is demo) - define the name of the stateful service that holds the Space data
- Space name (default is demo) - define the Space name that will be deployed within the GigaSpaces Platform
Data source properties
These properties define the connection to the selected data source. This enables easy connection, review, and selection of data at the source database that is used to create the GigaSpaces Object Types.
The data source type allows you to choose from one of the built-in data types connectors:
- MySQL
- Amazon RDS (MySQL)
- MS SQL
- Azure SQL
- HSQL
- Oracle
- PostgreSQL
Alternatively, it is possible to select Other to configure a connection to a new data source.
Maven properties
Defines the JDBC driver’s maven coordinates (group, artifact and version). Note that this will get auto-filled if you select a built-in data type with the latest version at the time of GigaSpaces Ops Manager release, but you can choose an older/newer version if needed.
Driver class
Defines the JDBC driver’s class name.
Hibernate dialect
Defines the dialect Hibernate should use to connect to the database. Note that this will get auto-filled if you select a built-in data type, but some databases use different dialects for different versions, so you may need to change it.
Connection string
Enter a connection string to the location of your source database.
If the database selected is MYSQL, and if JDK 8u291 or later is used, then the following text must be added to the connection string:
enabledTLSProtocols=TLSv1.2
For example:jdbc:mysql://localhost:3306/securities_master?enabledTLSProtocols=TLSv1.2
Username and Password
If your database is secured, enter the user name and password used for the source database.
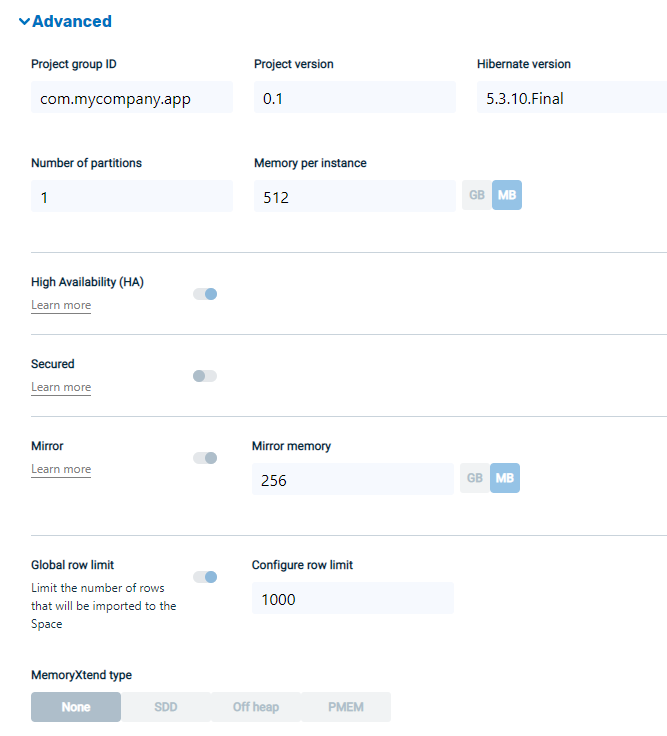
Advanced properties
These properties are required when choosing "other" as the data source.

Project group ID and version
The maven coordinates of the generated maven project. If you plan to download the generated code you may wish to change this.
Hibernate version
The version of the Hibernate dependency. Default is the hibernate version currently tested with GigaSpaces.
Number of partitions
The number of partitions to deploy your blueprint.
Memory per instance
The size of each partition. The default value is 512 MB.
High Availability (HA)
Determines if the space should be highly-available (i.e. each partition includes two instances instead of one).
Secured
Determines if the spaces should be secured. Requires additional manual configuration within the generated code. For more information, see https://docs.gigaspaces.com/latest/security/index.html
Mirror
Determines if changes to the space are mirrored back to the database.
Mirror Memory
The Mirror service runs in a separate process. This setting determines how much memory should be configured to its java settings
Row limit
The maximum number of rows for each table. This is mostly for data exploration scenarios, where you don’t/can’t load all the data from the database to the space.
Configure row limit
The maximum number of rows for each table
MemoryXtend type
Determines if memoryXtend should be used to store data in addition to RAM. For additional information on various memoryXtend configuration options see https://docs.gigaspaces.com/latest/admin/memoryxtend-overview.html.
Click Next to advance to the Data Schema Definition page.
Define a Data Schema

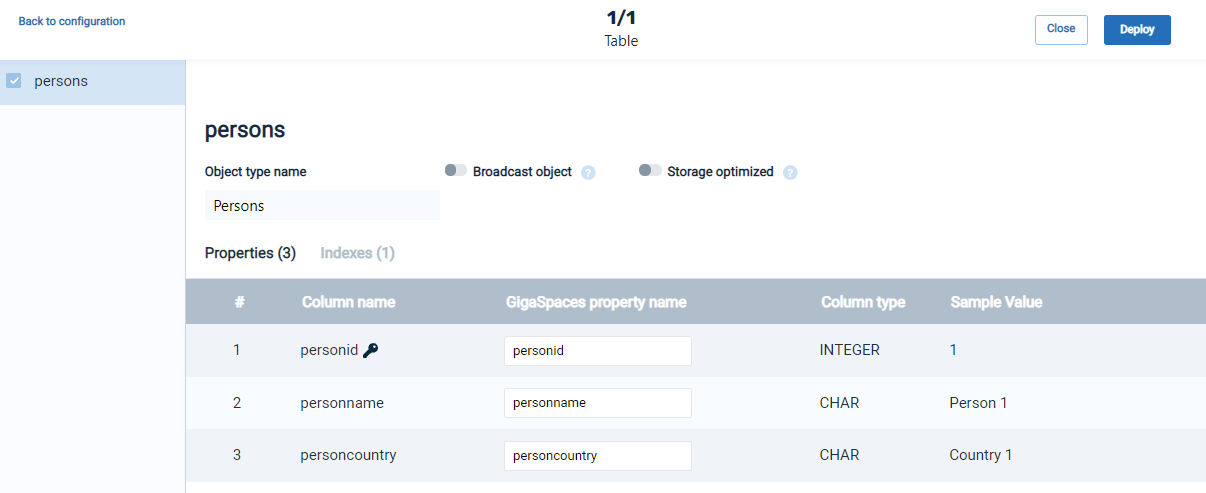
This page allows us to define the data schema, including which data tables and which properties to use and load to the GigaSpaces Space.
The page shows the tables of the source database at the left panel, and the corresponding Object Types with their properties and indexes, that will be loaded into the Space.
Each table can be individually selected, to be included in the resulting Space. The default is for all tables to be included. Each object type has a default name which is similar to the original name at the data source.
The Property Names of the destination Object Types are initialized to be as close as possible to the original database column names. These names can be changed as desired, but note that Java syntax rules are observed ("lower camel case").
In order for a table to be loaded into a Space, it must have a primary key. Tables without a primary key will appear as disabled on the left side of the screen and cannot be selected.
A primary key should not contain the special character ^ (caret). This special character will cause the field to be flagged as "auto generated" and may cause unexpected data to be inserted in the field.
Deploy and Run the System
Download Service Blueprint and Deploy
To download and deploy the service blueprint, click Deploy. This creates a zip file with scripts and files necessary to deploy the system. These files can be customized as required.
There are two options for the Blueprint:
- Manual -- Deployment customized by user.
The manual option generates a new Blueprint with the needed metadata and all other parameters/files needed to deploy. This option enables the fast creation of a Blueprint, with the ability to customize and add content to it manually prior to deployment. - Automatically -- Pre-configured for deployment on the user's local machine.
This option creates the Blueprint as in the previous option, but automatically tries to deploy it locally if GigaSpaces is available.
After a brief pause, a message will appear indicating that the project has been successfully deployed.
The first installation may require additional time to install required maven dependencies.
After manual or automatic deployment, the user can drill down to monitor the services or analyze the data and review the new services and data -- the Space and Object Types that were created.

