Data Integration
Data Integration allows data to be loaded into the GigaSpaces data grid using easily-defined, reusable Data Pipelines that require no user code.
A metrics dashboard shows data activity, including data volumes and statistics and any data validation errors or other access errors.
Information Required to Define a Data Pipeline
In order to create a new data pipeline, the following information is required:
-
The name of the data pipeline, type of connector, URL of the data source, and user/password or other authentication data. This information identifies where the data flow is located.
-
Selection of which tables and fields to use in the data source
-
The name of the target Gigaspace Space that will access the data.
-
Any validations to be performed on the source data, with stipulations of what to do if data errors occur.
-
Definition of optional Tiered Storage and Storage Optimization features
-
Actions to be performed if errors occur in the data loading process or if the target Space is redeployed.
Procedure to Define a Data Pipeline
To begin the process of creating a Data Pipeline, click on the Data Pipelines icon in Ops Manager, and then click on the + icon:

The Add Data Pipeline screen will display:
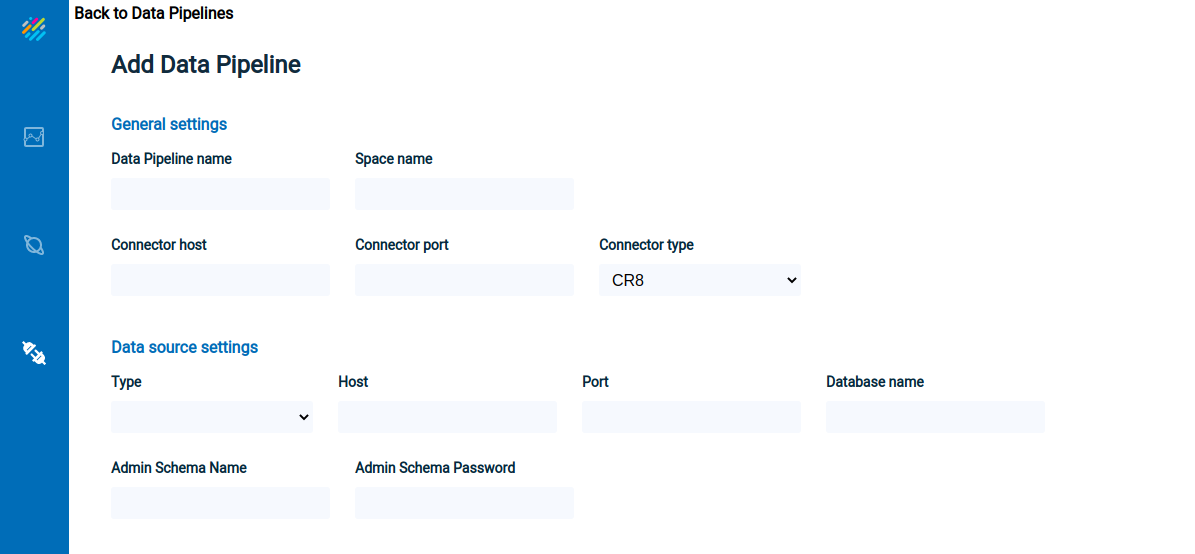
GigaSpaces properties
- Data Pipeline name — the name of the new Data Pipeline that will be introduced to the grid
- Space Name — the Space that will be connected to the Data Pipeline
- Connector Type — Available option: CR8
- Connector host — host of the CDC implementation component for the Data Pipeline
- Connector port — port of the CDC implementation component for the Data Pipeline
Data source properties
- Type — the type of data source for the Data Pipeline. Available options: MSSQL and DB2
- Host — IP or DNS host name of the source database server
- Port — Db2 z/OS source database port
- Database name — Location name of the Db2 z/OS database
- Admin schema name — A cr8admin login user on the source database that has all required privileges from the section “Db2 z/OS prerequisites”
- Admin schema password — Database password of the admin schema on the source database that has required privileges
After the first validation this parameter will be automatically encrypted by the CR8 and replaced inside the configuration file.
Enter the required data, as shown below, and click on Validate Connection.

Upon entering valid data, the Data Pipelines Overview screen will appear:

Data pipeline overview
-
Name — pipeline name
-
Origin — System of Record
-
Space name — the destination Space name
-
Pipeline status — reflects the consumer and connector statuses. Possible statuses are: PENDING, ACTIVE, BROKEN, UNHEALTHY, FULL_SYNC_IN_PROGRESS, FULL_SYNC_FAILED, FULL_SYNC_COMPLETED FULL_SYNC_COMPLETING, NOT_AVAILABLE, CONNECTOR_STOPPED, CONSUMER_STOPPED, PIPELINE_STOPPED
-
Connector status — status of the connector pulling data from the data source to the staging area
-
Consumer status — status of the consumer (PU) in the grid that is reading from the staging area, and doing operations against the Space. The possible statuses are:
-
pending
-
active
-
stopped
-
unhealthy - can be recovered from this state
-
broken - cannot recover from this state
-
-
Total operations — total number of insert, update and delete operations from the connector
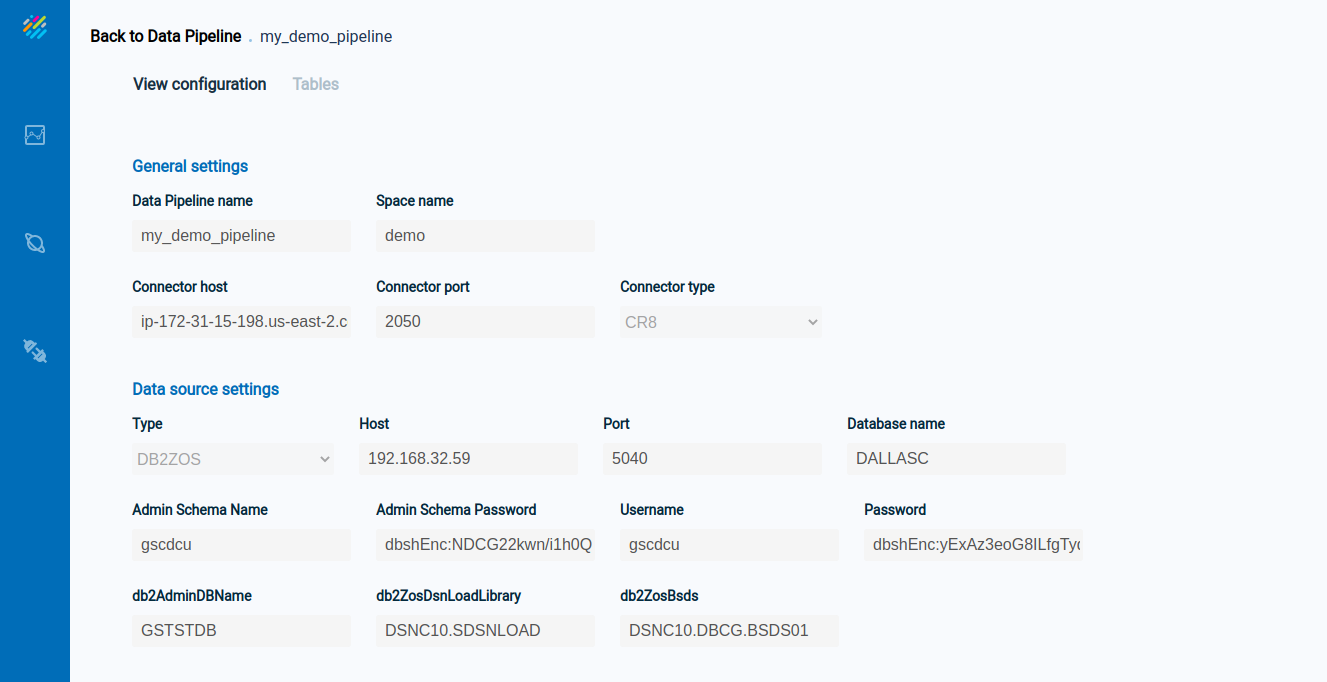
Click anywhere on the line describing the Data Pipeline, and detailed configuration information will display, with two tabs: View configuration and Tables.
The View configuration tab appears as follows:
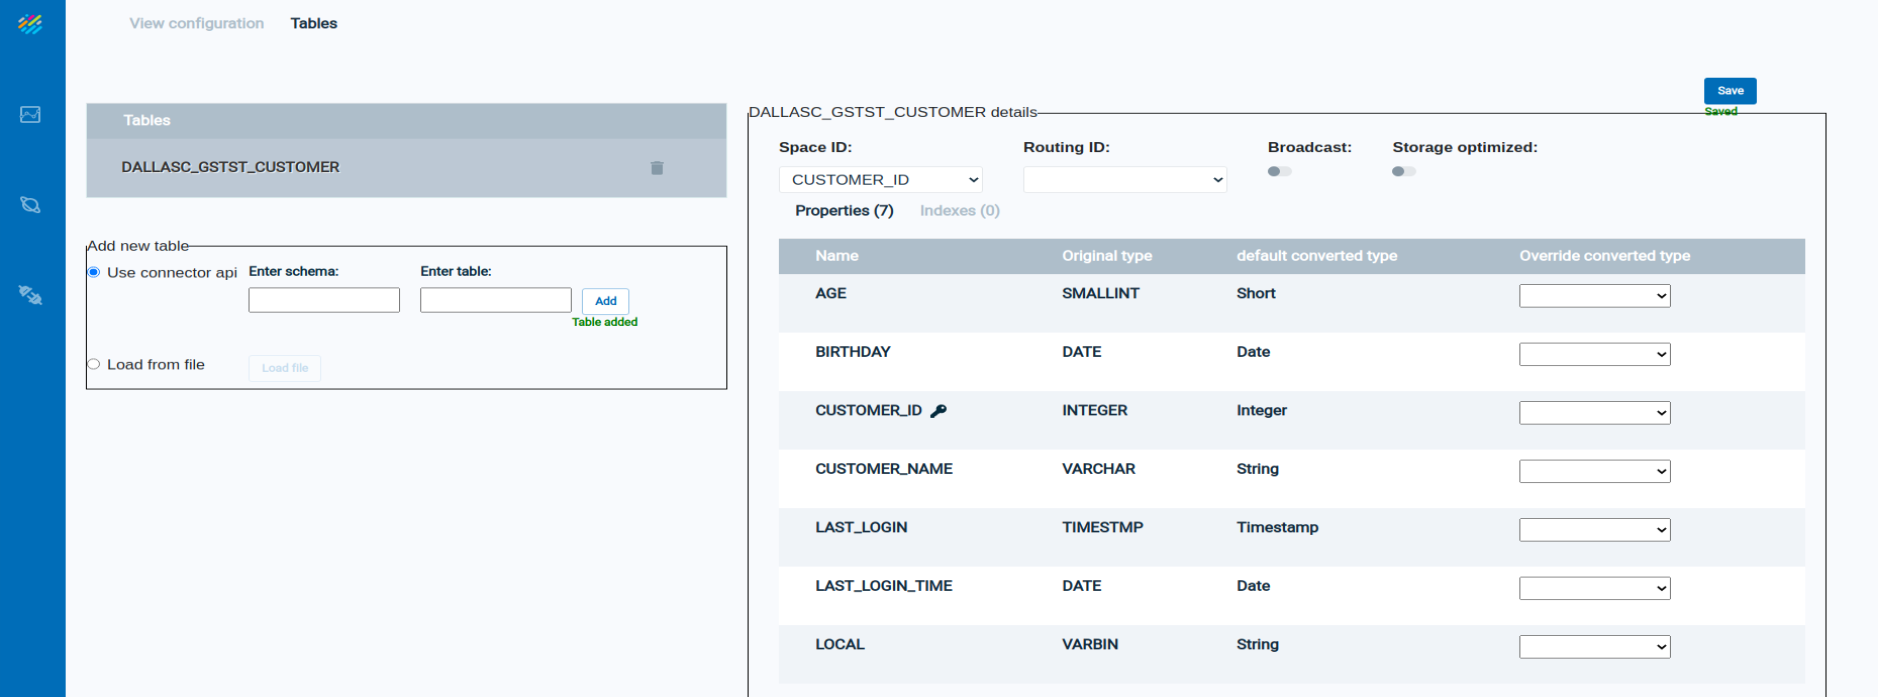
The Tables tab shows the list of tables in the Data Pipeline, which is initially empty. Enter information for a table on the bottom portion of the screen:
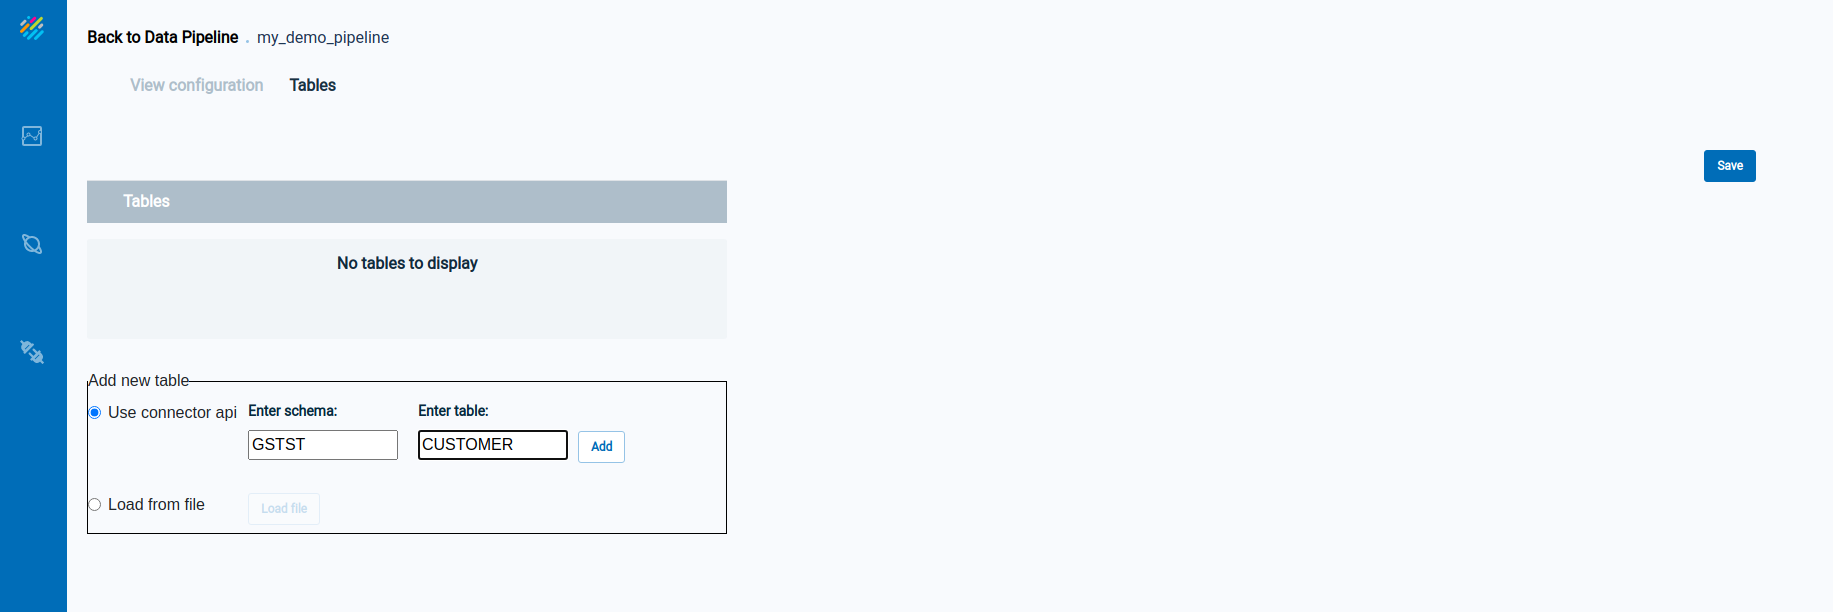
Click on Add to add a table to the Data Pipeline. The new table now appears in the list of tables near the top of the screen:
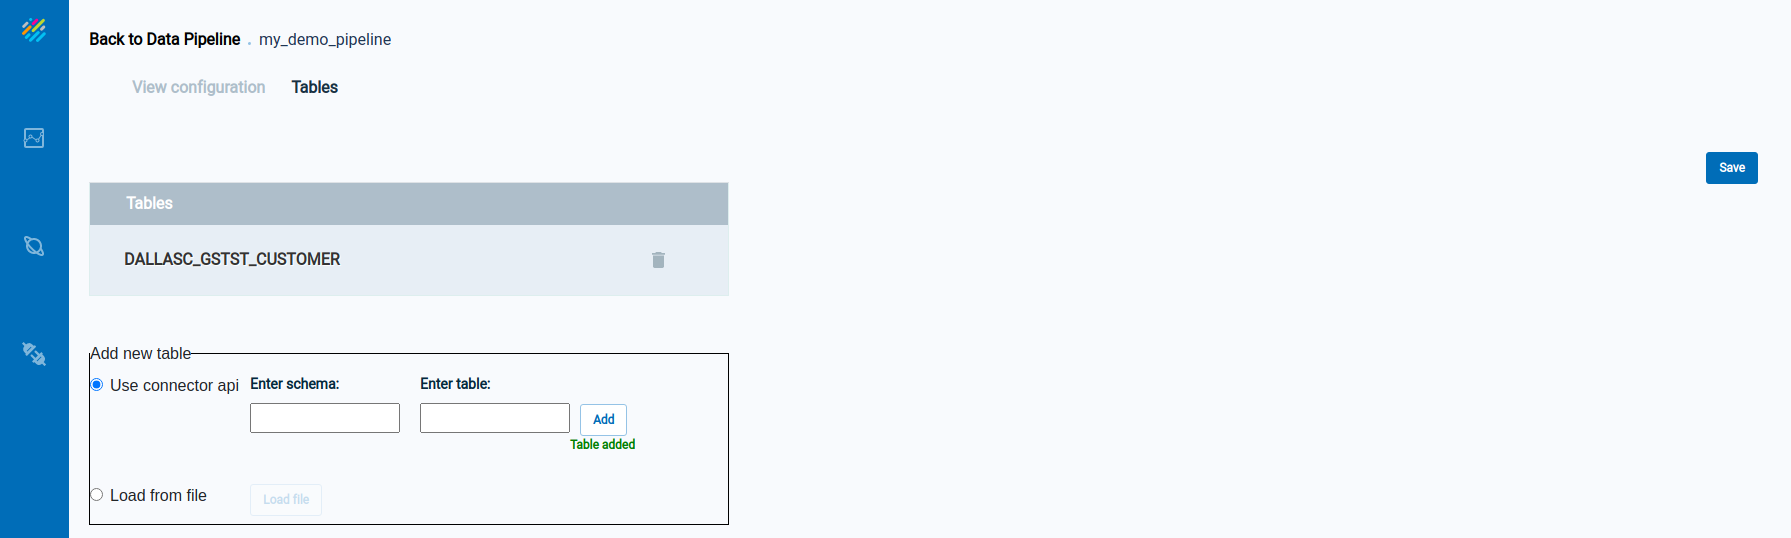
Click on the table name to see detailed information about the table:
Note that the three-dot menu now appears on the right side of the Data Pipelines Overview screen:

Press on the three-dot menu to see the operations available for the data pipeline:
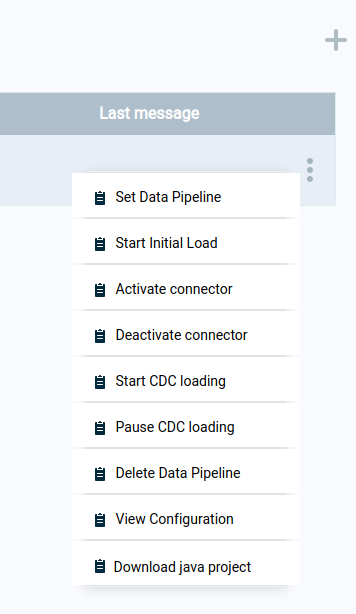
Download java project — download source code if customization is required
For the following operations, note that the connector service pulls data from the data source (System of Record) and pushes the data to the kafka staging area. The consumer process pulls data from the kafka staging area and pushes it to the destination Space.
Set Data Pipeline — deploy the consumer dervice
Start CDC loading — activate the consumer process
Start initial load — initiate initial data load from data source
Activate connector — start the connector service (CDC)
Deactivate connector — stop the connector service. This will also stop data from loading into the staging area (kafka).
Pause CDC loading — stop the consumer service. This will stop loading to the Space, but the staging area (kafka) will connect to gather data.
Delete data pipeline — end the pipeline process and remove all related data from the destination Space
View configuration — display the data pipeline definition

