DB2 Delta Server
| Author | XAP Version | Last Updated | Reference | Download |
|---|---|---|---|---|
| Chris Roffler | 9.6 | Nov 2013 |
Overview
Almost every large enterprise system includes legacy applications or backend systems that are communicating with the enterprise main database system for reporting, batch processing, data mining, OLAP and other processing activity. These applications might not need to access the data grid to improve their performance or scalability. They will be using the database directly. Once these systems perform data updates , removing data or add new records to the database, these updates might need to be reflected within the data grid. This synchronization activity ensures the data grid is consistent and up to date with the enterprise main database server.
The Delta Server described with this pattern responsible for getting notifications from the database for any user activity (excluding data grid updates) and delegate these to the data grid. You may specify the exact data set updates to be delegated to the data grid.
Scenario
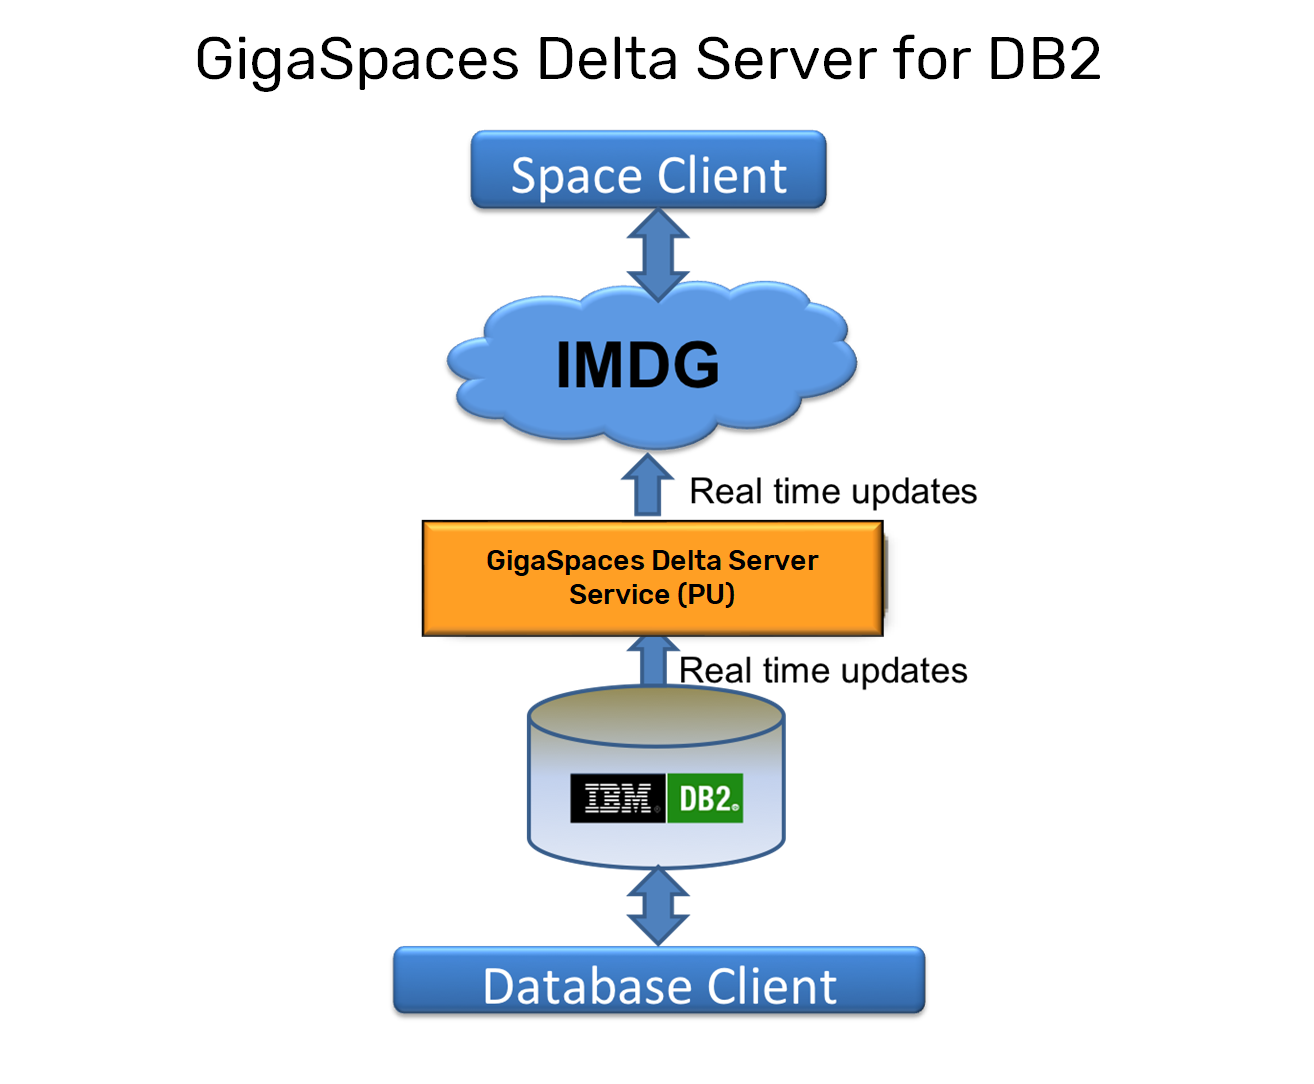
We have an In Memory Data Grid (IMDG) that is used for querying information. The initial load of the IMDG was performed from a DB2 Database. The IMDG is not used as a system of record in this case meaning that any changes to the objects in the IMDG are not propagated back into the Database. Non-Aware Data-Grid Clients are updating the Database. These updates (insert,update and delete) need to be reflected in the IMDG.
We will show you how you can implement this scenario with XAP. A fully functional example is available for download.
Prerequisites
- DB2 Advanced Server 10+ installation using default user (db2inst1) and group (dasadmin1)
- MQ Server 7+ installed using the default user group mqm and add user db2inst1 to mqm group
Installation
For simplicity, we install and execute this demo using the DB2 default user db2inst1. Log in to the Linux machine using the user db2inst1. download the sample code and extract to a folder say /home/db2inst1/db2mqrep. We’ll refer to this path as DEMO_HOME.
The following jar files are needed for this example:
 These files must be copied from the MQ server that you are running against.

 CL3Export.jar
 CL3Nonexport.jar
 com.ibm.mq.axis2.jar
 com.ibm.mq.commonservices.jar
 com.ibm.mq.defaultconfig.jar
 com.ibm.mq.headers.jar
 com.ibm.mq.jar
 com.ibm.mq.jmqi.jar
 com.ibm.mq.jms.Nojndi.jar
 com.ibm.mq.pcf.jar
 com.ibm.mq.postcard.jar
 com.ibm.mq.soap.jar
 com.ibm.mq.tools.ras.jar
 com.ibm.mqjms.jar
 com.ibm.msg.client.commonservices.wmq.jar
 rmm.jar
 dhbcore.jar

 Other jars:

 connector.jar
 fscontext.jar
 jms.jar
 jndi.jar
 jta.jar
 ldap.jar
 log4j-1.2.17.jar
 providerutil.jar
Prepare the db demo files
Change directory to the db2mqrep directory. We’ll execute a script that creates the db2sampl database PUBSRC and configures it for this demo. Execute the script democreatedb.sh using the command from a terminal window:
./democreatedb.sh
If your db2inst1 home directory doesn’t match the script, please update the path to the exact one on your installation.
You should see the following message on your terminal window:
 Creating database "PUBSRC"...
 Connecting to database "PUBSRC"...
 .........
Setting up the MQ Queue Managers
If the db2inst1 account is not part of the mqm group, then you need to add it to the group. In this step we will setup the replication for the data base changes. Execute the following script using the asnclp command:
asnclp -f demomq.asnclp
The output on the console should look something like this:
 ====
 CMD: asnclp session set to q replication;
 ====
 ====
 CMD: create mq script config type E
 ====
 .....
The previous script generates a shell script which needs to be executed. Let’s make this file executable first.
chmod u+x qrepl.pubsrc.mq_aixlinux.sh
Execute using the following command:
./qrepl.pubsrc.mq_aixlinux.sh
You should now see output on the console similar to below:
 WebSphere MQ queue manager created.
 Directory '/var/mqm/qmgrs/PUBSRC' created.
 The queue manager is associated with installation 'Installation1'.
 Creating or replacing default objects for queue manager 'PUBSRC'.
 Default objects statistics : 74 created. 0 replaced. 0 failed.
 ..........
To setup the asnclp session to replicate, execute the file demopub.asnclp
asnclp -f demopub.asnclp
You should see the following output:
 ====
 CMD: asnclp session set to q replication;
 ====
 ====
 CMD: set run script now stop on sql error on;
 .............
Create a directory called myQCap inside your current folder and cd to it and execute the following command:
asnqcap capture_server=PUBSRC
This will capture the actual replication information. You should see the following output:
 ASN0600I "Q Capture" : "" : "Initial" : Program "mqpub 10.1.0 (Level s120403, PTF LINUXAMD64101)" is starting.
 ASN7010I "Q Capture" : "ASN" : "WorkerThread" :
 The program successfully activated publication or Q subscription "EMPLOYEE0001"
 (send queue "ASN.PUBSRC.DATA", publishing or replication queue map "PUBSRC.ASN")
 for source table "DB2INST1.EMPLOYEE".

 ...........
Running the Demo
Step 1: Start the xap agent
\XAP_HOME\bin\gs-agent.sh
Step 2: Set environment variables for MQ
 export MQ_JAVA_INSTALL_PATH=/opt/mqm/java
 export MQ_JAVA_DATA_PATH=/var/mqm
 export MQ_JAVA_LIB_PATH=/opt/mqm/java/lib64
Step 3: Start the Delta Server
 java -Djava.library.path=/opt/mqm/java/lib64 -cp "/opt/mqm/java/lib:./*"
 com.gigaspaces.mq.listener.DB2SpaceListener
 -qmgr PUBSRC -queue ASN.PUBSRC.DATA -time 60000 -out DEPFiles
Make sure you include all the jars that are MQS specific.
Step 4: Update the data base to force notifications
 db2 connect to PUBSRC

 db2 "insert into employee(empno, firstnme, lastname, edlevel,workdept) values ('000015','MARK','POTTER',18,'C01')";

 db2 "insert into employee(empno, firstnme, lastname, edlevel,workdept) values ('000016','SALLY','JOHNSON',18,'A00')";
If you start the XAP Administration UI you should see under “mySpace” the entries we have inserted into the data base.